分类目录归档:技术笔记

Python 实战项目解决循环依赖问题

问题重现

在一次简单的代码合并后,发现 Python 项目跑不起来了,报错如下:

ssh://root@192.168.226.76:22/usr/bin/python3 -B -u /tmp/pycharm_project_882/mimic_daemon_server/helper_main.py
Traceback (most recent call last):
  File "/tmp/pycharm_project_882/mimic_daemon_server/helper_main.py", line 1, in 
<module>
    from mimic_daemon_server import create_app
  File "/tmp/pycharm_project_882/mimic_daemon_server/__init__.py", line 14, in 
<module>
    from mimic_daemon_server.nodes import nodes
  File "/tmp/pycharm_project_882/mimic_daemon_server/nodes/__init__.py", line 2, in 
<module>
    from . import route
  File "/tmp/pycharm_project_882/mimic_daemon_server/nodes/route.py", line 5, in 
<module>
    from mimic_daemon_server.guest_common import ReplicationConfig
  File "/tmp/pycharm_project_882/mimic_daemon_server/guest_common/__init__.py", line 3, in 
<module>
    from .abstract_config import AbstractConfig
  File "/tmp/pycharm_project_882/mimic_daemon_server/guest_common/abstract_config.py", line 16, in 
<module>
    import mimic_daemon_server.qemu_server.Drive
  File "/tmp/pycharm_project_882/mimic_daemon_server/qemu_server/__init__.py", line 25, in 
<module>
    from .QemuConfig import QemuConfig
  File "/tmp/pycharm_project_882/mimic_daemon_server/qemu_server/QemuConfig.py", line 12, in 
<module>
    from mimic_daemon_server.guest_common import AbstractConfig
ImportError: cannot import name 'AbstractConfig' from 'mimic_daemon_server.guest_common' (/tmp/pycharm_project_882/mimic_daemon_server/guest_common/__init__.py)

进程已结束,退出代码1

由于我在 Python 领域还是个初学者,没有遇到类似问题,但是根据分析,问题应该是出在了 循环依赖

a------->b-------->c
         ^         |
         |         |
         +----d<---+

报错分析

何为循环依赖呢?首先要搞清楚一点,python模块是天然的单例类,就是说第一次导入时会产生一个实例,后面再导入都会直接返回该实例。

模块的初始化时被导入时进行的,就是说每一次 import 都会执行 __init__.py 内的代码。

一旦 Python 的模块导入规划不合理,造成了多个互相依赖的模块均在第一次进入时开始实例化,就会产生 循环依赖 问题。

总结一下,Python 模块是可以循环依赖的,但是必须避免循环实例化

解决方法

解决循环依赖的方法也有很多:

(1)打破循环实例化态

如果想快速解决,在报错日志中找到循环实例化的两个模块,打破其循环实例化的状态即可。

例如观察文首的一段日志,会很明显的发现调用栈中前后引入了同一个模块,很容易定位到问题。

(2) 强制指定实例化顺序

可以在整个项目的根模块中的 __init__.py 中将所有子模块依赖一遍,调整可能出现循环依赖的顺序,就可以避免后期模块间依赖时产生不可预知的循环依赖问题。

也可以在模块中提供一个 init 方法,在需要的地方手动控制实例化顺序,避免导入时意外的循环依赖。

总结

Python 模块间可以随意引用,但是必须注意实例化的前后顺序,否则就会出现这种循环实例化问题,让人摸不着头脑。
参考文献

解决 perl: warning: Setting locale failed.

使用 Ubuntu 主机远程 PVE 服务器执行命令时报错:

# qm list
perl: warning: Setting locale failed.
perl: warning: Please check that your locale settings:
    LANGUAGE = (unset),
    LC_ALL = (unset),
    LC_ADDRESS = "zh_CN.UTF-8",
    LC_NAME = "zh_CN.UTF-8",
    LC_MONETARY = "zh_CN.UTF-8",
    LC_PAPER = "zh_CN.UTF-8",
    LC_IDENTIFICATION = "zh_CN.UTF-8",
    LC_TELEPHONE = "zh_CN.UTF-8",
    LC_MEASUREMENT = "zh_CN.UTF-8",
    LC_TIME = "zh_CN.UTF-8",
    LC_NUMERIC = "zh_CN.UTF-8",
    LANG = "en_US.UTF-8"
    are supported and installed on your system.
perl: warning: Falling back to a fallback locale ("en_US.UTF-8").

查看字符集配置发现有报错:

# locale
locale: Cannot set LC_ALL to default locale: No such file or directory
LANG=en_US.UTF-8
LANGUAGE=
LC_CTYPE="en_US.UTF-8"
LC_NUMERIC=zh_CN.UTF-8
LC_TIME=zh_CN.UTF-8
LC_COLLATE="en_US.UTF-8"
LC_MONETARY=zh_CN.UTF-8
LC_MESSAGES="en_US.UTF-8"
LC_PAPER=zh_CN.UTF-8
LC_NAME=zh_CN.UTF-8
LC_ADDRESS=zh_CN.UTF-8
LC_TELEPHONE=zh_CN.UTF-8
LC_MEASUREMENT=zh_CN.UTF-8
LC_IDENTIFICATION=zh_CN.UTF-8
LC_ALL=

经过分析错误为 LC_ALL 没设置值,LC_CTYPELC_MESSAGES 的值 zh_CN.UTF-8 系统未安装。

远程主机默认仅支持 en_US.UTF-8 ,而我的客户端默认配置为 zh_CN.UTF-8 ,结果远程时服务端继承了客户端配置,导致字符集报错。

此时无需在远程做任何配置,只需断开远程连接,将下面一行配置写入我的 Ubuntu 主机中的 ~./bashrc 即可:

export LC_ALL=C

原理

在设定主机 locale 时存在一个优先级,可总结为 LC_ALL > LC_* >LANG ,可以说 LC_ALL最上级设定或者强制设定,而 LANG 是默认设定值。

若需了解详情可拓展阅读参考文献。

参考文献

Perl 调试打印 HASH 内容

在调试 Perl 程序时常常需要打印哈希表内容,虽然可以直接使用 foreach 打印,但数据复杂了就难办了,此时可以将 Hash 表转换为 json 文本再打印:

use JSON;

my $data = {'info'=> "test", 'struct' => {'test1'=>'test1', 'test2'=>'test2'}};
my $json = new JSON;
#$json->sort_by(sub { ncmp($JSON::PP::a, $JSON::PP::b) });
my $json_text = $json->pretty->encode ($data);
print $json_text;

如果没有 json 包需要安装一下:

cpan -i JSON

如果下载太慢,可以使用 tuna 提供的 cpan 国内镜像源:

# 若tuna cpan不在镜像列表中则将其加入列表首位
if ! (
    perl -MCPAN -e 'CPAN::HandleConfig->load();' \
        -e 'CPAN::HandleConfig->prettyprint("urllist")' |
    grep -qF 'https://mirrors.tuna.tsinghua.edu.cn/CPAN/'
); then
    perl -MCPAN -e 'CPAN::HandleConfig->load();' \
        -e 'CPAN::HandleConfig->edit("urllist", "unshift", "https://mirrors.tuna.tsinghua.edu.cn/CPAN/");' \
        -e 'CPAN::HandleConfig->commit()'
fi

测试一下,效果还可以:

$ perl -e 'use JSON;
> 
> my $data = {'info'=> "test", 'struct' => {'test1'=>'test1', 'test2'=>'test2'}};
> my $json = new JSON;
> #$json->sort_by(sub { ncmp($JSON::PP::a, $JSON::PP::b) });
> my $json_text = $json->pretty->encode ($data);
> print $json_text;'
{
   "struct" : {
      "test2" : "test2",
      "test1" : "test1"
   },
   "info" : "test"
}

参考文献

分享一个快捷内网、漏洞扫描工具 fscan

fscan 是一款 go 语言写成 “一款内网综合扫描工具,方便一键自动化、全方位漏扫扫描”。是我在刷 kon9chunkit 发起的 GitHub中文排行榜 时发现的。

该工具支持主机存活探测、端口扫描、常见服务的爆破、ms17010、redis批量写公钥、计划任务反弹shell、读取win网卡信息、web指纹识别、web漏洞扫描、netbios探测、域控识别等功能。

用来快速扫描局域网主机存活也是很好的,下面简单介绍使用方法:

安装很简单,装好 go 环境编译一下就行:

$ git clone https://github.com/shadow1ng/fscan.git
$ cd facan
$ go build -ldflags="-s -w " -trimpath

之后就可以进行扫描了,快速进行局域网段扫描:

$ ./fscan -h 192.168.123.0/24 

   ___                              _    
  / _ \     ___  ___ _ __ __ _  ___| | __ 
 / /_\/____/ __|/ __| '__/ _` |/ __| |/ /
/ /_\\_____\__ \ (__| | | (_| | (__|   <    
\____/     |___/\___|_|  \__,_|\___|_|\_\   
                     fscan version: 1.6.3
start infoscan
已完成 0/0 listen ip4:icmp 0.0.0.0: socket: operation not permitted
The current user permissions unable to send icmp packets
start ping
(icmp) Target '192.168.123.9' is alive
(icmp) Target '192.168.123.4' is alive
...
icmp alive hosts len is: 7
192.168.123.3:443 open
...
alive ports len is: 19
start vulscan
[*] WebTitle:http://192.168.123.1      code:401 len:140    title:401 Unauthorized
.....

完整支持参数如下:

    -c string
        ssh命令执行
  -cookie string
        设置cookie
  -debug int
        多久没响应,就打印当前进度(default 60)
  -domain string
        smb爆破模块时,设置域名
  -h string
        目标ip: 192.168.11.11 | 192.168.11.11-255 | 192.168.11.11,192.168.11.12
  -hf string
        读取文件中的目标
  -hn string
        扫描时,要跳过的ip: -hn 192.168.1.1/24
  -m string
        设置扫描模式: -m ssh (default "all")
  -no
        扫描结果不保存到文件中
  -nobr
        跳过sql、ftp、ssh等的密码爆破
  -nopoc
        跳过web poc扫描
  -np
        跳过存活探测
  -num int
        web poc 发包速率  (default 20)
  -o string
        扫描结果保存到哪 (default "result.txt")
  -p string
        设置扫描的端口: 22 | 1-65535 | 22,80,3306 (default "21,22,80,81,135,139,443,445,1433,3306,5432,6379,7001,8000,8080,8089,9000,9200,11211,27017")
  -pa string
        新增需要扫描的端口,-pa 3389 (会在原有端口列表基础上,新增该端口)
  -path string
        fcgi、smb romote file path
  -ping
        使用ping代替icmp进行存活探测
  -pn string
        扫描时要跳过的端口,as: -pn 445
  -pocname string
        指定web poc的模糊名字, -pocname weblogic
  -proxy string
        设置代理, -proxy http://127.0.0.1:8080
  -user string
        指定爆破时的用户名
  -userf string
        指定爆破时的用户名文件
  -pwd string
        指定爆破时的密码
  -pwdf string
        指定爆破时的密码文件
  -rf string
        指定redis写公钥用模块的文件 (as: -rf id_rsa.pub)
  -rs string
        redis计划任务反弹shell的ip端口 (as: -rs 192.168.1.1:6666)
  -silent
        静默扫描,适合cs扫描时不回显
  -sshkey string
        ssh连接时,指定ssh私钥
  -t int
        扫描线程 (default 600)
  -time int
        端口扫描超时时间 (default 3)
  -u string
        指定Url扫描
  -uf string
        指定Url文件扫描
  -wt int
        web访问超时时间 (default 5)

总之是一款很实用的工具,平时有很多场景可以使用到。

参考文献

Windows 禁用 AppXSVC 解决 CPU 占用高问题

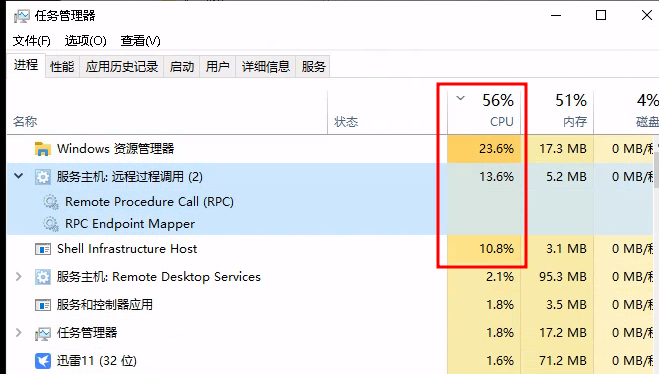
在一台虚拟机上安装了 Windows 10 lstc 2021 版,启动后发现 CPU 占用率一直居高不下,查看任务管理器发现是一个叫 wsapp 的系统服务服务占用 CPU 过高,搜索后发现对应的是 AppX Deployment Service 系统服务,是用来提供 微软应用商店服务服务的。

这就很奇怪了,lstc 没有预装微软应用商店呀,因此也不能使用常规方法将其关闭,实测在服务管理器中也无法直接关闭。

解决方法

后面我发现其实可以通过修改注册表的方式去禁用该服务,方法很简单:

Step1 打开注册表编辑器

两种方法可以打开:

  1. 在任务栏上的搜索框中,键入regedit,然后选择”注册表编辑器 (桌面应用) 结果。
  2. 右键单击”开始”, 然后选择”运行”。“打开:”框中键入 regedit,然后选择”确定“。

Step2 禁用服务

首先在注册表编辑器中找到这一项:

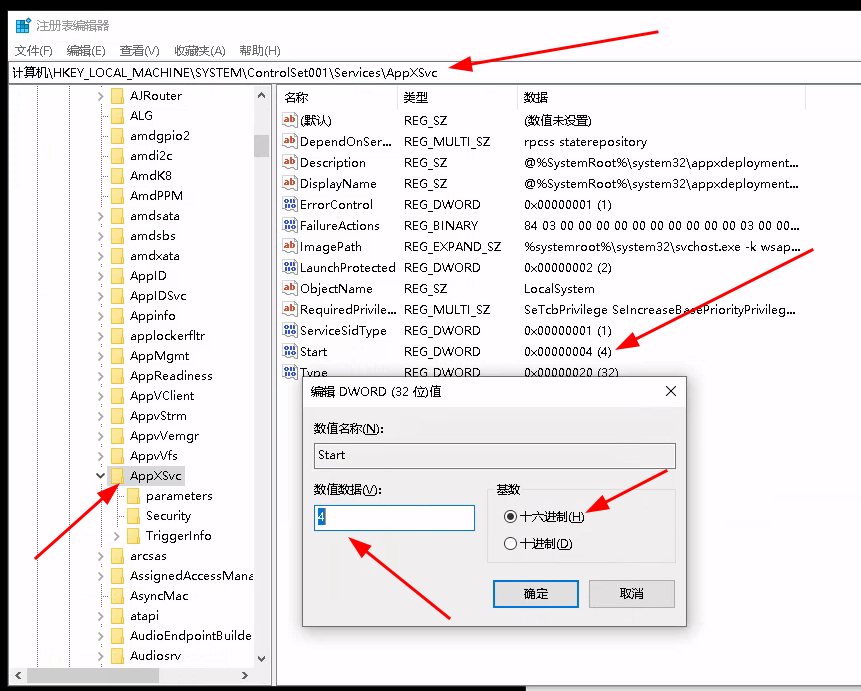
HKEY_LOCAL_MACHINE\SYSTEM\ControlSet001\Services\AppXSvc

之后在右侧找到 Start 将值由原本的 3 改为 4 即可。

https://imagehost-cdn.frytea.com/images/2021/12/16/image46a917cd3ecedee5.png

大概像图片中这样。

最后重启即可!

Step3 查看效果

重启后查看任务管理器,发现再也没有长期占用 CPU 50% 以上的 AppXSVC 服务了。

https://imagehost-cdn.frytea.com/images/2021/12/16/image0e48aeaeec65f56a.png

结束。

参考文献

Git 常用操作

记录常用 git 操作命令,方便速查.


# 注:若没有标记“远程”,则默认为操作本
 <a href="https://blog.frytea.com/archives/1233/#more-1233" class="more-link">继续阅读 <span class="meta-nav">&rarr;</span></a>

更换 PVE7 软件仓库源和 CT模板(LXC)源为国内源

PVE7 安装后默认配置的 apt 软件源和 CT(LXC)容器模板源均是官方默认的,国内使用性能不佳,建议替换为 清华 Tuna 提供的国内镜像源,速度将有一个较大的提升。

如果 pve 官网 iso 镜像下载较慢,也可在 tuna 提供的镜像站下载:https://mirrors.tuna.tsinghua.edu.cn/proxmox/iso/

注:本文以 pve 7.0.2 (debian 11 bulleye) 为例,其他版本请自行在镜像网站寻找对应地址。

替换 apt 软件源

替换前建议先更新下证书,否则可能由于证书不可用导致 https 无法使用,进而无法下载所有软件。

$ sudo apt install apt-transport-https ca-certificates

首先替换通用软件源, Debian 的软件源配置文件是 /etc/apt/sources.list,备份后将其中内容修改为以下即可。

# 默认注释了源码镜像以提高 apt update 速度,如有需要可自行取消注释
deb https://mirrors.tuna.tsinghua.edu.cn/debian/ bullseye main contrib non-free
# deb-src https://mirrors.tuna.tsinghua.edu.cn/debian/ bullseye main contrib non-free
deb https://mirrors.tuna.tsinghua.edu.cn/debian/ bullseye-updates main contrib non-free
# deb-src https://mirrors.tuna.tsinghua.edu.cn/debian/ bullseye-updates main contrib non-free

deb https://mirrors.tuna.tsinghua.edu.cn/debian/ bullseye-backports main contrib non-free
# deb-src https://mirrors.tuna.tsinghua.edu.cn/debian/ bullseye-backports main contrib non-free

deb https://mirrors.tuna.tsinghua.edu.cn/debian-security bullseye-security main contrib non-free
# deb-src https://mirrors.tuna.tsinghua.edu.cn/debian-security bullseye-security main contrib non-free

之后替换 pve 软件源,pve 镜像默认的 pve 软件源配置文件是 /etc/apt/sources.list.d/pve-enterprise.list ,备份后将其中内容替换为以下即可:

deb https://mirrors.tuna.tsinghua.edu.cn/proxmox/debian bullseye pve-no-subscription

最后更新下,速度很快:

sudo apt-get update

修改 CT Templates (LXC容器)源

将 /usr/share/perl5/PVE/APLInfo.pm 文件中默认的源地址 http://download.proxmox.com 替换为 https://mirrors.tuna.tsinghua.edu.cn/proxmox 即可。

可以使用如下命令修改:

cp /usr/share/perl5/PVE/APLInfo.pm /usr/share/perl5/PVE/APLInfo.pm_back
sed -i 's|http://download.proxmox.com|https://mirrors.tuna.tsinghua.edu.cn/proxmox|g' /usr/share/perl5/PVE/APLInfo.pm

针对 /usr/share/perl5/PVE/APLInfo.pm 文件的修改,重启后生效。

systemctl restart pvedaemon.service

之后在 pve 网页端下载 CT Templates 速度就很快了。

参考文献