故事开始的地方,深入 Linux 系统的启动流程,自己编译内核并制作根文件系统,并使用 QEMU 模 继续阅读
深入理解 Linux 启动过程 | QEMU 启动 linux 内核和自制根文件系统
发表评论
故事开始的地方,深入 Linux 系统的启动流程,自己编译内核并制作根文件系统,并使用 QEMU 模 继续阅读
介绍两种 Linux 环境下测试硬件性能的方法.
在 Linux 环境下如何测试 CPU 等硬件和 继续阅读
云端服务器安装远程浏览器。
为了操作家里的群晖服务器,之前一直是通过 VPN 或是Todesk、向 继续阅读
UOS 20 1021 12011.101SW_64 SW16211.解压 runc 源码至 ~/go/src/github.com/opencontainers 目录;
~/go/
└── src
    └── github.com
        └── opencontainers
            └── runc
2.进入 runc 主目录,替换 vendor/golang.org/x/sys/unix 目录为申威平台 golang1.14.1 源码 go-sw64-1.14.1/src/cmd/vendor/golang.org/x/sys/unix 目录。
3.修改 libcontainer/system/syscall_linux_64.go 文件,在文件头添加 sw64 架构定义 //+build sw64。
$ head libcontainer/system/syscall_linux_64.go
// +build sw64
// +build linux
// +build arm64 amd64 mips mipsle mips64 mips64le ppc ppc64 ppc64le riscv64 s390x sw64
4.修改 Makefile,去掉 runc 编译过程的-buildmode=pie,执行 make && make install 进行编译、安装。
$ make
go build  -ldflags "-X main.gitCommit="04433551a33fa0c5e1c547759074e4bce9a7ecde-dirty" -X main.version=1.0.0-rc10 " -tags "seccomp" -o runc .
$ sudo make install
验证成功
install -D -m0755 runc /usr/local/sbin/runc1.解压 containerd 源码至 ~/go/src/github.com/containerd 目录,重命名为 containerd;
~/go/
└── src
    └── github.com
        └── containerd
            └── containerd
2.进入 containerd 主目录,替换 vendor/golang.org/x/sys/unix 目录为申威平台 golang1.14.1 源码中的 go-sw64-1.14.1/src/cmd/vendor/golang.org/x/sys/unix 目录。
cp -r ~/go-sw64-1.14.1/src/cmd/vendor/golang.org/x/sys/unix vendor/golang.org/x/sys/unix3.修改 vendor/github.com/containerd/fifo/handle_linux.go 文件,并将 const O_PATH=010000000 改为 040000000 。
$ vim vendor/github.com/containerd/fifo/handle_linux.go
- const O_PATH = 010000000
+ const O_PATH = 040000000
4.修改 platforms/database.go 文件,在 isKnownArch 函数中添加 sw64
// isKnownArch returns true if we know about the architecture.
//
// The arch value should be normalized before being passed to this function.
func isKnownArch(arch string) bool {
        switch arch {
        case "386", "amd64", "amd64p32", "arm", "armbe", "arm64", "arm64be", "ppc64", "ppc64le", "mips", "mipsle", "mips64", "mips64le", "mips64p32", "mips64p32le", "ppc", "riscv", "riscv64", "s390", "s390x", "sparc", "sparc64", "wasm", "sw64":
                return true
        }
        return false
}
5.修改 containerd 主目录下的 Makefile.linux 文件,取消 sw64 的 -buildmode=pie 编译选项,执行 make && make install 进行编译、安装。
$ vim Makefile.linux
ifeq ($(GOOS),linux,!sw64)
        GO_GCFLAGS +=
endif

$ make
+ bin/ctr
+ bin/containerd
+ bin/containerd-stress
+ bin/containerd-shim
+ bin/containerd-shim-runc-v1
+ bin/containerd-shim-runc-v2
+ binaries
$ sudo make install
+ install bin/ctr bin/containerd bin/containerd-stress bin/containerd-shim bin/containerd-shim-runc-v1 bin/containerd-shim-runc-v2systemd 管理 containerd 服务。首先将 containerd 主目录下的 containerd.service 文件复制到 /usr/lib/systemd/system/ 目录,然后执行 systemctl daemon-reload 、 systemctl start containerd 、 systemctl enable containerd,最后执行 systemctl status containerd 查看服务状态。$ sudo cp containerd.service /usr/lib/s
ystemd/system/
songtianlun@user-uos:~/go/src/github.com/containerd/containerd$ systemctl daemon-reload
==== AUTHENTICATING FOR org.freedesktop.systemd1.reload-daemon ===
Info: Verification successful
==== AUTHENTICATION COMPLETE ===
$ sudo systemctl enable containerd
$ sudo systemctl start containerd
$ sudo systemctl status containerd
● containerd.service - containerd container runtime
Loaded: loaded (/lib/systemd/system/containerd.service; enabled; vendor preset: enabled)
Active: active (running) since Wed 2021-11-10 10:00:29 CST; 1h 9min ago
Docs: https://containerd.io
Main PID: 707 (containerd)
Tasks: 22
Memory: 50.8M
CGroup: /system.slice/containerd.service
└─707 /usr/local/bin/containerd
解压 docker-ce-18.09.zip ,将 components 目录下的 cli 和 engine 复制到 ~/go/src/github.com/docker 目录下,并将 engine 目录改名为 docker ,分别编译得到 docker-cli 及 dockerd 组件。
~/go/
└── src
    └── github.com
        └── docker
            ├── cli
└── dockerdocker-cli1.进入 cli 目录,替换 vendor/golang.org/x/sys/unix 目录为申威平台 golang1.14.1 源码中的 go-sw64-1.14.1/src/cmd/vendor/golang.org/x/sys/unix 目录。
$ cp -r ~/go-sw64-1.14.1/src/cmd/vendor/golang.org/x/sys/unix vendor/golang.org/x/sys/unix2.修改 vendor/github.com/containerd/fifo/handle_linux.go 文件,并将 const O_PATH=010000000 改为 040000000。
$ vim vendor/github.com/containerd/fifo/handle_linux.go
- const O_PATH = 010000000
+ const O_PATH = 040000000
3.执行 make VERSION=18.09.9 进行本地编译,编译后得到的二进制文件在 build 目录下。
$ make VERSION=18.09.9

WARNING: you are not in a container.
Use "make -f docker.Makefile " or set
DISABLE_WARN_OUTSIDE_CONTAINER=1 to disable this warning.

Press Ctrl+C now to abort.

WARNING: binary creates a Linux executable. Use cross for macOS or Windows.
./scripts/build/binary
Building statically linked build/docker-linux-sw64

$ sudo cp docker /usr/bin/dockerd1.进入 docker 目录,替换 vendor/golang.org/x/sys/unix 目录为申威平台 golang1.14.1 源码中的 go-sw64-1.14.1/src/cmd/vendor/golang.org/x/sys/unix 目录。
$ cp -r ~/data/go-sw64-1.14.1/src/cmd/vendor/golang.org/x/sys/unix vendor/golang.org/x/sys/unix2.修改 vendor/github.com/containerd/fifo/handle_linux.go 文件,将 const O_PATH=010000000 改为 040000000。
$ vim vendor/github.com/containerd/fifo/handle_linux.go
- const O_PATH = 010000000
+ const O_PATH = 040000000
3.修改 vendor/github.com/containerd/containerd/platforms/database.go 文件,在 isKnownArch 函数中添加 sw64 。
// isKnownArch returns true if we know about the architecture.
//
// The arch value should be normalized before being passed to this function.
func isKnownArch(arch string) bool {
        switch arch {
        case "386", "amd64", "amd64p32", "arm", "armbe", "arm64", "arm64be", "ppc64", "ppc64le", "mips", "mipsle", "mips64", "mips64le", "mips64p32", "mips64p32le", "ppc", "riscv", "riscv64", "s390", "s390x", "sparc", "sparc64", "wasm", "sw64":
                return true
        }
        return false
}
4.修改 vendor/github.com/opencontainers/runc/libcontainer/system/syscall_linux_64.go 文件,在文件头添加 //+build sw64 。
$ head vendor/github.com/opencontainers/runc/libcontainer/system/syscall_linux_64.go
// +build linux
// +build arm64 amd64 mips mipsle mips64 mips64le ppc ppc64 ppc64le s390x sw64
5.修改 hack/make/.binary 文件,取消 linux/sw64 平台的 buildmode=pie 选项。
case "$(go env GOOS)/$(go env GOARCH)" in
        windows/*|linux/mips*|linux/sw64)
                ;;
        *)
                BUILDFLAGS+=( "" )
                ;;
esac
6.执行 VERSION=18.09.9 GOPATH="/root/go" DOCKER_GITCOMMIT=new ./hack/make.sh dynbinary-daemon 进行本地编译,编译后得到的二进制文件在 bundles 目录下。
$ VERSION=18.09.9 GOPATH="/home/songtianlun/go" DOCKER_GITCOMMIT=new ./hack/make.sh
$ sudo cp bundles/binary-daemon/dockerd /usr/bin/
sudo VERSION=18.09.9 GOPATH="/home/songtianlun/go" DOCKER_GITCOMMIT=new KEEPBUNDLE=1 ./hack/make.sh install-binarydocker-init1.解压 tini 源码,进入 tini 主目录;
$ wget https://github.com/krallin/tini/archive/refs/tags/v0.19.0.tar.gz
$ mv v0.19.0.tar.gz tini-v0.19.0.tar.gz
$ tar xvf tini-v0.19.0.tar.gz
$ cd tini-0.19.0
2.执行 cmake . && make tini-static ,编译得到 tini-static 二进制文件;
$ cmake .
-- The C compiler identification is GNU 8.3.0
-- Check for working C compiler: /usr/bin/cc
-- Check for working C compiler: /usr/bin/cc -- works
-- Detecting C compiler ABI info
-- Detecting C compiler ABI info - done
-- Detecting C compile features
-- Detecting C compile features - done
fatal: 不是一个 git 仓库:'/home/songtianlun/data/tini-0.19.0/.git'
fatal: 不是一个 git 仓库:'/home/songtianlun/data/tini-0.19.0/.git'
-- Performing Test HAS_BUILTIN_FORTIFY
-- Performing Test HAS_BUILTIN_FORTIFY - Failed
-- Configuring done
-- Generating done
-- Build files have been written to: /home/songtianlun/data/tini-0.19.0

$ make tini-static
Scanning dependencies of target tini-static
[ 50%] Building C object CMakeFiles/tini-static.dir/src/tini.c.o
[100%] Linking C executable tini-static
[100%] Built target tini-static
3.执行 cp tini-static docker-init,得到 docker-init。
sudo cp docker-init /usr/bin/docker-proxy1.解压 libnetwork 源码到 ~/go/src/github.com 目录,重命名为 libnetwork ;
$ git clone https://github.com/moby/libnetwork.git2.进入 libnetwork 主目录,替换 vendor/golang.org/x/sys/unix 目录为申威平台golang1.14.1 源码中的 go-sw64-1.14.1/src/cmd/vendor/golang.org/x/sys/unix 目录。
$ cp -r ~/data/go-sw64-1.14.1/src/cmd/vendor/golang.org/x/sys/unix vendor/golang.org/x/sys/unix3.进入 cmd/proxy 目录,执行 CGO_ENABLED=0 go build -o docker-proxy ,得到 docker-proxy 二进制文件。
$ go get
$ CGO_ENABLED=0 go build -o docker-proxy
$ sudo cp docker-proxy /usr/bin/1.按上述步骤安装 runc 、 containerd ,并启动 containerd 服务;
2.复制编译得到的二进制文件 docker 、 dockerd 、 docker-init 、 docker-proxy 到 /usr/bin 目录下;
docker/contrib/init/systemd 目 录 下 的 docker.service 和 docker.socket 文 件 复 制 到 /lib/systemd/system 目录下,添加 docker 组: groupadd --system docker。$ sudo cp ~/go/src/github.com/docker/docker/contrib/init/systemd/docker.service /lib/systemd/system/
$ sudo cp ~/go/src/github.com/docker/docker/contrib/init/systemd/docker.socket /lib/systemd/system/4.执行 systemctl daemon-reload 、 systemctl start docker 、 systemctl enable docker 启动 docker 服务。
$ sudo systemctl status docker
● docker.service - Docker Application Container Engine
   Loaded: loaded (/lib/systemd/system/docker.service; enabled; vendor preset: enabled)
   Active: active (running) since Wed 2021-11-10 17:32:07 CST; 4min 33s ago
     Docs: https://docs.docker.com
 Main PID: 815 (dockerd)
    Tasks: 21 (limit: 4915)
   Memory: 94.9M
   CGroup: /system.slice/docker.service
└─815 /usr/bin/dockerd -H fd://拉取测试镜像
docker pull harbor.sh.deepin.com/library/minideb:latestdocker运行
docker run -d -it harbor.sh.deepin.com/library/minideb shPackage libseccomp was not found in the pkg-config search path.sudo apt install libseccomp-devfatal error: btrfs/ioctl.h: No such file or directory$ sudo apt-get install libbtrfs-dev
$ yum install btrfs-progs-develPackage devmapper was not found in the pkg-config search path.$ sudo apt-get install libdevmapper-dev
$ yum install device-mapper-develIptables/1.8.2 Failed to initialize nft: Protocol not supported# update-alternatives --set iptables /usr/sbin/iptables-legacy
# update-alternatives --set ip6tables /usr/sbin/ip6tables-legacy
# update-alternatives --set arptables /usr/sbin/arptables-legacy
# update-alternatives --set ebtables /usr/sbin/ebtables-legacy附件若无法下载请转到本文的 Notion 共享页下载:https://fryteacs.notion.site/SW-1621-UOS-20-Docker-c1d7ff16b6a4492a99c794fab253b24d
互联网上搜索到的 Linux 环境新磁盘配置方法资料质量都不尽如人意,因此自己整理了一份,日常 Linux 磁盘分区时查阅足够了,主要是用到了 fdisk 命令。
fdisk 基本使用新增硬盘后,在linux系统下输入 fdisk -l 命令查看当前磁盘信息:
$ sudo fdisk -l
...
Disk /dev/ram0: 4.8 GiB, 5120000000 bytes, 10000000 sectors
Units: sectors of 1 * 512 = 512 bytes
Sector size (logical/physical): 512 bytes / 8192 bytes
I/O size (minimum/optimal): 8192 bytes / 8192 bytes
...
Disk /dev/sda: 465.8 GiB, 500107862016 bytes, 976773168 sectors
Disk model: ST500DM002-1BD14
Units: sectors of 1 * 512 = 512 bytes
Sector size (logical/physical): 512 bytes / 4096 bytes
I/O size (minimum/optimal): 4096 bytes / 4096 bytes
Disklabel type: gpt
Disk identifier: C16B3C7C-2596-448D-A4BA-4A7554CD734A

Device     Start       End   Sectors   Size Type
/dev/sda1   2048 976773119 976771072 465.8G Linux filesystem
...

Disk /dev/sdc: 3.7 TiB, 4000787030016 bytes, 7814037168 sectors
Disk model: ST4000NM000A-2HZ
Units: sectors of 1 * 512 = 512 bytes
Sector size (logical/physical): 512 bytes / 512 bytes
I/O size (minimum/optimal): 512 bytes / 512 bytes
...
注意看最下面多了一块 3.7TB 的硬盘 sdc ,下面用命令: fdisk /dev/sdc 给新硬盘进行分区:
$ sudo fdisk /dev/sdc

Welcome to fdisk (util-linux 2.33.1).
Changes will remain in memory only, until you decide to write them.
Be careful before using the write command.

The old LVM2_member signature will be removed by a write command.

Device does not contain a recognized partition table.
The size of this disk is 3.7 TiB (4000787030016 bytes). DOS partition table format cannot be used on drives for volumes larger than 2199023255040 bytes for 512-byte sectors. Use GUID partition table format (GPT).

Created a new DOS disklabel with disk identifier 0xe461c452.

Command (m for help):
进入 fdisk 命令,输入 m 可以看到该命令的帮助:
Command (m for help): m

Help:

  DOS (MBR)
   a   toggle a bootable flag
   b   edit nested BSD disklabel
   c   toggle the dos compatibility flag

  Generic
   d   delete a partition
   F   list free unpartitioned space
   l   list known partition types
   n   add a new partition
   p   print the partition table
   t   change a partition type
   v   verify the partition table
   i   print information about a partition

  Misc
   m   print this menu
   u   change display/entry units
   x   extra functionality (experts only)

  Script
   I   load disk layout from sfdisk script file
   O   dump disk layout to sfdisk script file

  Save & Exit
   w   write table to disk and exit
   q   quit without saving changes

  Create a new label
   g   create a new empty GPT partition table
   G   create a new empty SGI (IRIX) partition table
   o   create a new empty DOS partition table
s create a new empty Sun partition table进行分区前需要先明确采用分区表的格式,目前主流的有 MBR 和 GPT ,二者的区别可以自行搜索,总结两点:
知道上面两点就够了,这里我使用在 Linux 服务器上,不需要考虑 windows 兼容性,此外是一块 4T 盘,因此采用 GPT 进行分区,下面两种方式请根据自己的需要选择。
如果使用 GPT 则输入 g 创建一张新的空 GPT 格式分区表。
ommand (m for help): g
Created a new GPT disklabel (GUID: D53735F6-8E14-504D-BDA5-89DB97A770DF).
The old LVM2_member signature will be removed by a write command.
之后输入 n 进行分区,
Command (m for help): n选择分区表编号,根据提示目前最多可以创建128个分区,保持默认即可:
Partition number (1-128, default 1):之后选择该分区的起始磁盘数,这里可自定义也可不做选择,如无特殊需求强烈建议选择默认:
First sector (2048-7814037134, default 2048):接下来是定义该分区的大小,默认使用整个,直接回车:
Last sector, +/-sectors or +/-size{K,M,G,T,P} (2048-7814037134, default 7814037134): 创建成功:
Created a new partition 1 of type 'Linux filesystem' and of size 3.7 TiB.最后记得 w 将分区表写入硬盘。
如果使用 MBR 则输入 o 创建一张新的空 MBR 格式分区表:
Command (m for help): o
The size of this disk is 3.7 TiB (4000787030016 bytes). DOS partition table format cannot be used on drives for volumes larger than 2199023255040 bytes for 512-byte sectors. Use GUID partition table format (GPT).

Created a new DOS disklabel with disk identifier 0xe3e2291c.
The old LVM2_member signature will be removed by a write command.
输入 n 进行分区:
Command (m for help): n
Partition type
   p   primary (0 primary, 0 extended, 4 free)
   e   extended (container for logical partitions)
一块物理硬盘只能有: 一到四个主分区(但其中只能有一个是活动的主分区),或一到三个主分区,和一个扩展分区。分别对应hda1,hda2,hda3,hda4. Linux 中规定,每一个硬盘设备最多能有 4 个主分区(其中包含扩展分区)构成,任何一个扩展分区都要占用一个主分区号码,也就是在一个硬盘中,主分区和扩展分区一共最多是 4 个。 —— 《Linux主分区,扩展分区,逻辑分区的联系和区别》
总接下来就是一块物理硬盘至少有一个主分区,在这里我只需要一个分区,因此下面将这块硬盘全部划为主分区:
Select (default p): p之后选择该主分区为第几个主分区,由于是新盘,这里输入1来分第一个主分区:
Partition number (1-4, default 1): 1之后选择该分区的起始磁盘数,这里可自定义也可不做选择,如无特殊需求强烈建议选择默认:
First sector (2048-4294967295, default 2048):接下来是定义该分区的大小,如果按默认(按回车)即是使用全部可用存储额,也可以是用 M 或 m 单位结尾的数字(大写M是大B的意思,如果输入1M实际上是X8也就是8m的空间),这里我保持默认:
Last sector, +/-sectors or +/-size{K,M,G,T,P} (2048-4294967294, default 4294967294):

Created a new partition 1 of type 'Linux' and of size 2 TiB.
可以看到即使硬盘是 4TB,采用 MBR 后只能使用其中的 2TB 空间,其他的就浪费了。
最后记得 w 将分区表写入硬盘。
完成分区后,记得输入 w 写入分区:
Command (m for help): w
The partition table has been altered.
Calling ioctl() to re-read partition table.
Syncing disks.
写入分区表成功后会退出 fdisk 交互界面。
再看一眼磁盘信息:
$ sudo fdisk -l
...
Disk /dev/sdc: 3.7 TiB, 4000787030016 bytes, 7814037168 sectors
Disk model: ST4000NM000A-2HZ
Units: sectors of 1 * 512 = 512 bytes
Sector size (logical/physical): 512 bytes / 512 bytes
I/O size (minimum/optimal): 512 bytes / 512 bytes
Disklabel type: gpt
Disk identifier: 74A6DB69-8C91-654F-9F61-A9F38D7F2A34

Device     Start        End    Sectors  Size Type
/dev/sdc1   2048 7814037134 7814035087  3.7T Linux filesystem
...没问题后进行格式化,如果没有特殊需求就采用 ext4 :
第四代扩展文件系统(英语:Fourth extended filesystem,缩写为ext4)是Linux系统下的日志文件系统,是ext3文件系统的后继版本 —— ext4 By Wikipedia。
$ sudo mkfs.ext4 /dev/sdc1
mke2fs 1.44.5 (15-Dec-2018)
Creating filesystem with 976754384 4k blocks and 244195328 inodes
Filesystem UUID: 87746749-1922-4682-9b4e-3a67be1d9498
Superblock backups stored on blocks:
        32768, 98304, 163840, 229376, 294912, 819200, 884736, 1605632, 2654208,
        4096000, 7962624, 11239424, 20480000, 23887872, 71663616, 78675968,
        102400000, 214990848, 512000000, 550731776, 644972544

Allocating group tables: done
Writing inode tables: done
Creating journal (262144 blocks): done
Writing superblocks and filesystem accounting information: done之后将磁盘挂载到需要的位置,一般会选择挂载在 /mnt ,我在这里由于涉及到多用户,将硬盘挂载我用户目录下的一个文件夹下:
sudo mount /dev/sdc1 /home/songtianlun/data直接挂载,重启后配置会丢失,可以修改 /etc/fstab 配置文件配置开机自动挂载,该配置文件的格式如下:
$ cat /etc/fstab
# /etc/fstab: static file system information.
#
# Use 'blkid' to print the universally unique identifier for a
# device; this may be used with UUID= as a more robust way to name devices
# that works even if disks are added and removed. See fstab(5).
#
# <file system> <mount point>   <type>  <options>       <dump>  <pass>
# / was on /dev/sda7 during installation
UUID=4ae9f128-7cee-48fd-998c-4257e394fa4a /               ext4    errors=remount-ro 0       1
# /boot/efi was on /dev/sda1 during installation
UUID=A5EB-573A  /boot/efi       vfat    umask=0077      0       1
/swapfile                                 none            swap    sw              0       0

# /dev/sda1
/dev/sda1    /    ext4  rw,relatime 0   1
UUID=4ae9f128-7cee-48fd-998c-4257e394fa4a /               ext4    errors=remount-ro 0       1
格式大概是这样的:
# <file system> <mount point>   <type>  <options>       <dump>  <pass>
# 要挂载的分区设备号 挂载点 文件系统类型  挂载选项    是否备份    是否检测
如果需要设备号,可以使用 blkid 命令获取:
$ blkid
/dev/sda1: UUID="e943af1e-72cf-4b72-b444-859b9610256f" TYPE="ext4" PARTUUID="161a8c3f-871d-45f6-a25f-466bf16f6035"
实测下面这两种都是可以挂载的:
UUID=4ae9f128-7cee-48fd-998c-4257e394fa4a /               ext4    errors=remount-ro     0       1
/dev/sda1       /               ext4            rw,relatime     0       1
写好配置后可以使用该命令生效(挂载 /etc/fstab 中所有档案):
mount -a下次重启设备就不需要再手动挂载该磁盘了。
使用 lsblk 看一下当前硬盘的树形结构:
$ lsblk
NAME   MAJ:MIN RM   SIZE RO TYPE MOUNTPOINT
sda      8:0    0 465.8G  0 disk
└─sda1   8:1    0 465.8G  0 part /
sdc      8:32   0   3.7T  0 disk
└─sdc1   8:33   0   3.7T  0 part /home/songtianlun/data
使用 df-h 看看使用率:
$ df -h
文件系统        容量  已用  可用 已用% 挂载点
/dev/sda1       459G  8.6G  427G    2% /
...
/dev/sdc1 3.6T 89M 3.4T 1% /home/songtianlun/data在使用 libvirt 管理虚拟机时,有时会用到 virt-manager 提供的图形界面管理虚拟机,查看 vnc 输出等,但是常常会得到如下错误:
(virt-manager:25381): Gtk-WARNING **: 08:55:23.876: cannot open display:如果是在 Linux 桌面环境,解决方法很简单,只需要这样连接远程服务器就可以了:
ssh -Y username@ip使用 -Y 参数实际上是授权了 X11 转发,这样就可以看到来自远端的 gtk 图形窗口了。
$ man ssh
...
-Y      Enables trusted X11 forwarding.  Trusted X11 forwardings are not subjected to the X11 SECURITY extension controls.
...
如果您的操作系统设置为中文,远端连接过来也会继承这一配置,这时如果远端没有安装中文字库,就会出现乱码:
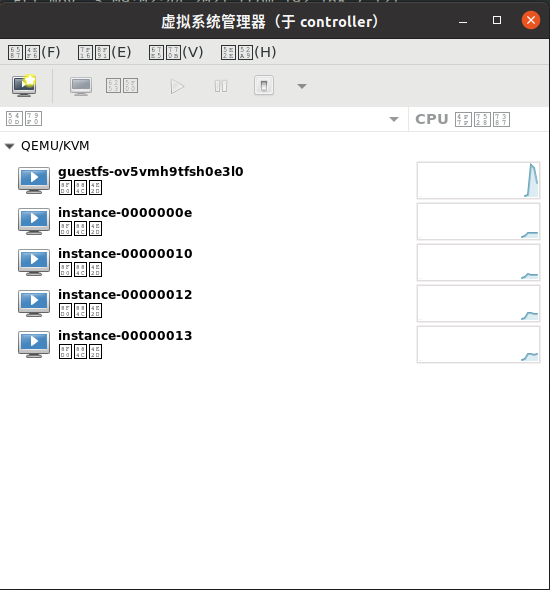
解决方法也很简单,只需使用以下命令,临时将远端服务器的语言配置为英文即可:
export LANG=en_US再次打开窗口发现一切正常:
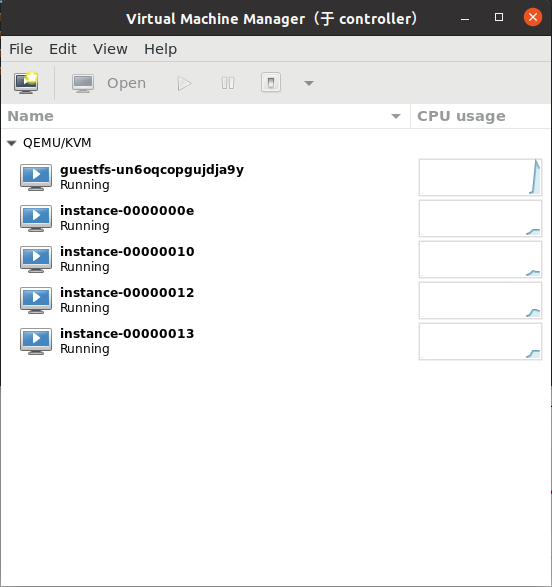
在 Windows 下不是每一个终端模拟器都支持 x11 转发,使用 MobaXterm 直接可以连接,也可以使用 Xming 连接即可。
在 windows 下有如 Beyond Compare 这样的文本对比工具,而在 Linux 其实预装了很好用的文本对比工具 → vimdiff
使用方法很简单:
vimdiff [options] file1 file2 [file3 [file4]]比如这样:
vimdiff Release Release.new效果是这样的:
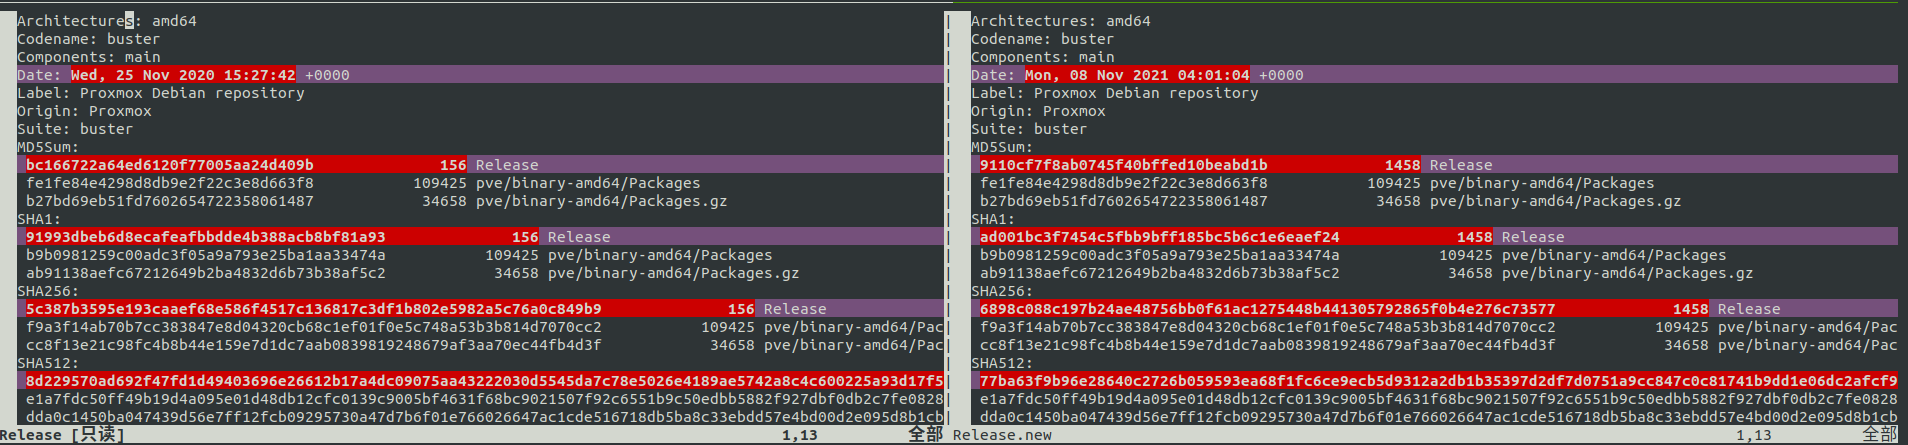
可以使用 Ctrl + w + 方向键 # 切换到前/下/上/后一个窗格 切换窗格,使用 i 进行编辑,操作同多窗口 Vim ,使用起来很方便,效果很惊艳,效率很高。
Centos 下演示编译安装 Perl 环境的方法.
Perl是[高端](https:// 继续阅读
Ubuntu 软件包管理采用国内镜像源的配置方法.
Ubuntu 是目前较为流行的 Linux 发 继续阅读
Ubuntu 新版网络配置方法.
近期常常用到 Ubuntu 20.04 server 镜像,在一 继续阅读