设置默认的规则

iptables -P INPUT DROP # 配置默认的不让进
iptables -P FORWARD DROP # 默认的不允许转发
iptables -P OUTPUT ACCEPT # 默认的可以出去iptables 设置默认规则
发表评论
设置默认的规则
iptables -P INPUT DROP # 配置默认的不让进
iptables -P FORWARD DROP # 默认的不允许转发
iptables -P OUTPUT ACCEPT # 默认的可以出去macOS 下可选择多种 Emacs GUI ,建议 Emacs Mac Port。
brew tap railwaycat/emacsmacport
brew install --cask emacs-mac
相较于 Emacs For Mac OS X ,Emacs Mac Port 界面效果更好,裸 Emacs 的图标更加美观,建议使用。
dos2unix 是将 Windows 格式文件转换为 Unix/Linux 格式的实用命令。
unix2dos则是和dos2unix互为孪生的一个命令,将Linux&Unix格式文件转换为Windows格式文件的命令。
各个操作系统安装方法如下:
OS X
    brew install dos2unix
Debian
    apt-get install dos2unix
Ubuntu
    apt-get install dos2unix
Alpine
    apk add dos2unix
Arch Linux
    pacman -S dos2unix
Kali Linux
    apt-get install dos2unix
CentOS
    yum install dos2unix
Fedora
    dnf install dos2unix
Windows (WSL2)
    sudo apt-get update sudo apt-get install dos2unix
Raspbian
    apt-get install dos2unix
Dockerfile
    dockerfile.run/dos2unix
Docker
    docker run cmd.cat/dos2unix dos2unix
下面以 15分钟学会Emacs Lisp 教学源文件为例展示效果。
$ dos2unix learn-emacs-lisp-zh.el
dos2unix: converting file learn-emacs-lisp-zh.el to Unix format...
转换前后的对比如下:
上方是转换后的文件,下方是转换前的文件,使用 Emacs 打开。
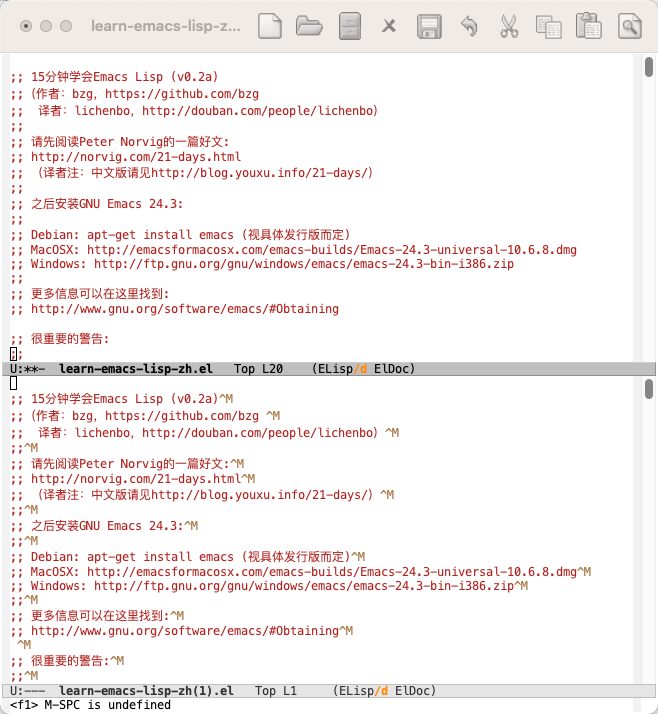
可以看到,转换前该文件使用的是 Windows 风格的换行符,转换后该文件使用 Unix 风格换行符。
Unix 系统中:每行结尾只有 “”,即
\n; Windows 系统中:每行结尾是 “”,即\r\n; Mac 系统中:每行结尾是 “”,即\r“。
建议软件包安装,二进制安装请自行解决配置问题,docker安装需考虑网络问题。
apt install prometheus-blackbox-exporter# 下载安装
wget https://github.com/prometheus/blackbox_exporter/releases/download/v0.23.0/blackbox_exporter-0.23.0.linux-amd64.tar.gz
tar -xvf blackbox_exporter-0.23.0.linux-amd64.tar.gz
mv blackbox_exporter-0.23.0.linux-amd64/ /usr/local/blackbox_exporter
# 创建配置文件
cat > /data/black_exporter/black_exporter.yml << EOF
modules:
http_2xx:
prober: http
timeout: 20s
http:
preferred_ip_protocol: "ip4"
http_post_2xx_query:
prober: http
timeout: 20s
http:
preferred_ip_protocol: "ip4" ##使用ipv4
method: POST
headers:
Content-Type: application/json ##header头
body: '{"hmac":"","params":{"publicFundsKeyWords":"xxx"}}' ##传参
tls_connect_tls:
prober: tcp
timeout: 5s
tcp:
tls: true
tcp_connect:
prober: tcp
timeout: 5s
#
pop3s_banner:
prober: tcp
tcp:
query_response:
- expect: "^+OK"
tls: true
tls_config:
insecure_skip_verify: false
ssh_banner:
prober: tcp
tcp:
query_response:
- expect: "^SSH-2.0-"
irc_banner:
prober: tcp
tcp:
query_response:
- send: "NICK prober"
- send: "USER prober prober prober :prober"
- expect: "PING :([^ ]+)"
send: "PONG ${1}"
- expect: "^:[^ ]+ 001"
icmp:
prober: icmp
timeout: 20s
EOF
# 配置systemd
cat > /etc/systemd/system/blackbox_exporter.service <<EOF
[Unit]
Description=blackbox_exporter
Documentation=https://prometheus.io/
After=network.target
[Service]
Type=simple
User=prometheus
ExecStart=/usr/local/bin/blackbox_exporter --config.file=/data/blackbox-exporter/black-exporter.yml
Restart=on-failure
[Install]
WantedBy=multi-user.target
EOF
# 启动服务
systemctl enable blackbox_exporter.service
systemctl start blackbox_exporter.service
systemctl status blackbox_exporter.service
docker run --rm \
  -p 9115/tcp \
  --name blackbox_exporter \
  -v $(pwd):/config \
  quay.io/prometheus/blackbox-exporter:latest --config.file=/config/blackbox.yml

# 创建配置文件
cat > /data/docker/blackbox-exporter/black-exporter.yml << EOF
modules:
  http_2xx:
    prober: http
    timeout: 20s
    http:
      preferred_ip_protocol: "ip4"
  http_post_2xx_query:
    prober: http
    timeout: 20s
    http:
      preferred_ip_protocol: "ip4" ##使用ipv4
      method: POST
      headers:
        Content-Type: application/json ##header头
      body: '{"hmac":"","params":{"publicFundsKeyWords":"xxx"}}' ##传参
  tls_connect_tls:
    prober: tcp
    timeout: 5s
    tcp:
      tls: true
  tcp_connect:
    prober: tcp
    timeout: 5s
 #
  pop3s_banner:
    prober: tcp
    tcp:
      query_response:
      - expect: "^+OK"
      tls: true
      tls_config:
        insecure_skip_verify: false
  ssh_banner:
    prober: tcp
    tcp:
      query_response:
      - expect: "^SSH-2.0-"
  irc_banner:
    prober: tcp
    tcp:
      query_response:
      - send: "NICK prober"
      - send: "USER prober prober prober :prober"
      - expect: "PING :([^ ]+)"
        send: "PONG ${1}"
      - expect: "^:[^ ]+ 001"
  icmp:
    prober: icmp
    timeout: 20s
EOF

docker run -d \
  --net myDefault \
  --restart always \
  -p 9115:9115/tcp \
  --name blackbox-exporter \
  -v /data/docker/blackbox-exporter:/config \
songtianlun/blackbox-exporter:v0.23.0 --config.file=/config/black-exporter.ymlcurl http://192.168.5.152:9115/probe?target=www.frytea.com&module=http_2xx# https monitor
- job_name: 'hci-https-monitor'
metrics_path: /probe
params:
module: [tls_connect_tls]
static_configs:
- targets:
- 'https://192.168.5.221:8006'
- 'https://192.168.5.222:8006'
- 'https://192.168.5.187:8006'
relabel_configs:
- source_labels: [__address__]
target_label: __param_target
- source_labels: [__param_target]
target_label: instance
- target_label: __address__
replacement: 10.19.0.1:9115 # The blackbox exporter's real hostname:port.
# http monitor
- job_name: 'hci-http-monitor'
metrics_path: /probe
params:
module: [http_2xx]
static_configs:
- targets:
- 'http://192.168.5.221:3000'
relabel_configs:
- source_labels: [__address__]
target_label: __param_target
- source_labels: [__param_target]
target_label: instance
- target_label: __address__
replacement: 10.19.0.1:9115 # The blackbox exporter's real hostname:port.
# icmp 监控
- job_name: 'hci-icmp-monitor'
scrape_interval: 1m
metrics_path: /probe
params:
module: [ "icmp" ]
static_configs:
- targets:
- 192.168.5.254
- 192.168.5.221
- 192.168.5.222
- 192.168.5.187
relabel_configs:
- source_labels: [__address__]
target_label: __param_target
- source_labels: [__param_target]
target_label: instance
- target_label: __address__
replacement: 10.19.0.1:9115 # The blackbox exporter's real hostname:port.
Grafana导入Dashboard-ID:7587
最近在使用 Paralles Desktop 过程中,发现一旦忘记用户密码,是一件挺麻烦的事情。尝试各种方法打不开 grub 启动菜单。
后来发现可以使用其提供的命令工具修改用户密码,很好用,在此记录:
# 首先获取虚拟机 UUID
$ prlctl list
UUID                                    STATUS       IP_ADDR         NAME
{fdf05394-dc61-4d07-b6e5-e81ef5277a64}  running      -               Ubuntu 22.04 ARM64

# 设定用户密码
$ prlctl set fdf05394-dc61-4d07-b6e5-e81ef5277a64 --userpasswd
<USERNAME>:<PASSWORD>
Authentication tokens updated successfully.
Success. The operation was successfully completed.

The VM has been successfully configured.尝试在 MacBook Air m1 安装 asahi linux ,在磁盘分区过程遭遇报错,具体过程没有留下来,是类似这样的报错:
error: doc-id tree: record exists for doc-id 64, file-id 9665861 but no inode references this doc-id大致解决是要进恢复模式,之后使用急救程序尝试修复。
尝试后发现还是报错,后来在 asahi linux 的 github 找到一个类似问题,使用下列方法解决:
I had a similar issue, where /dev/disk3s5 had warnings that wouldn’t go away, and I solved it as follows:
Boot into recovery and open a terminal
`diskutil unmountdisk /dev/disk3`
`fsck_apfs /dev/disk3` (and hit y in response to the various prompts)
I believe unmounting was the important part.
之后磁盘分区就不报错了。
参考文献: https://github.com/AsahiLinux/asahi-installer/issues/88#issuecomment-1095019173
chrony是网络时间协议的实现。它可以替代ntpd,后者是NTP的参考实现。它在类Unix操作系统上运行,并在GNU GPL v2下发布。
服务端和客户端配置文件都是同一个,分别配置为服务器和客户端即可使用,
配置文件在 /etc/chrony.conf or /etc/chrony/chrony.conf ,具体看版本,
可以使用 man chrony 确认一下。
服务端配置:
# Use public servers from the pool.ntp.org project.
# Please consider joining the pool (http://www.pool.ntp.org/join.html).
server s1a.time.edu.cn iburst
server ntp.aliyun.com iburst

# Allow NTP client access from local network.
allow 192.168.8.0/24
开启同步
systemctl enable chronyd
systemctl restart chronyd

# 查看时间同步状态
timedatectl status
# 开启网络时间同步
timedatectl set-ntp true# Use public servers from the pool.ntp.org project.
# Please consider joining the pool (http://www.pool.ntp.org/join.html).
server 192.168.8.5 iburst
# Allow NTP client access from local network.开启同步
systemctl enable chronyd
systemctl restart chronyd

# 查看时间同步状态
timedatectl status
# 开启网络时间同步
timedatectl set-ntp true# 查看 ntp_servers
chronyc sources -v
# 查看 ntp_servers 状态
chronyc sourcestats -v
# 查看 ntp_servers 是否在线
chronyc activity -v
# 查看 ntp 详细信息
chronyc tracking -v以下为删除 LVM 步骤,需要按照顺序执行:
卸载 LV 上的文件系统。
a.执行命令 mount –l 命令查看目前LV挂载到本地的目录。
b. 执行 umount 挂载的目录卸载挂载在LV上的文件系统。
使用 lvdisplay 命令查询LV信息,获取需要删除 LV 的 LV name
使用 lvremove LV name 命令删除LV
# lvremove /dev/vg0/lv0

提示是否删除:

Do you really want to remove active logical volume "lv0"? [y/n]:

输入y 确认后显示如下信息,说明LV删除成功。

Logical volume "lv0" successfully removed删除VG。
# vgremove /dev/vg0

显示如下信息,说明PV删除成功。

Labels on physical volume "/dev/sda1" successfully wipedd使用 pvremove 命令移除 PV
最后使用 fdisk 修改 ID
在服务器和容器平台建议关闭 SWAP,避免内存交换影响服务器性能,甚至引发数据丢失。
一、不重启电脑,禁用启用swap,立刻生效
# 禁用命令

sudo swapoff -a

# 启用命令

sudo swapon -a

# 查看交换分区的状态
sudo free -m二、重新启动电脑,永久禁用Swap
把根目录文件系统设为可读写
sudo mount -n -o remount,rw /用vi修改/etc/fstab文件,在swap分区这行前加 # 禁用掉,保存退出
vi /etc/fstab

i      #进入insert 插入模式

:wq   #保存退出
mount -a
# 使 fstab 文件生效重新启动电脑,使用free -m查看分区状态
reboot

sudo free -mpkg-config 是一个在源代码编译时查询已安装的库的使用接口的计算机工具软件。
其工作原理如下:
当安装一个库时(例如从RPM,deb或其他二进制包管理系统),会包括一个后缀名为 pc 的文件,它会放入某个文件夹下(依赖于你的系统设置)。
例如,在 Linux 为该软件的库文件所在文件夹 lib 之下的子文件夹 pkgconfig 。
并把该子文件夹加入 pkg-config 的环境变量 PKG_CONFIG_PATH 作为搜索路径,例如在 bash 配置文件中加入一行:
$ export PKG_CONFIG_PATH=/usr/local/`库的名字`/lib/pkgconfig:$PKG_CONFIG_PATH在这个.pc文件里包含有数个条目。这些条目通常包含用于其他使用这个库的程序编译时需要的库设置,以及头文件的位置,版本信息和一个简介。
这是一个用于libpng的.pc文件的样例:
prefix=/usr/local
 exec_prefix=${prefix}
 libdir=${exec_prefix}/lib
 includedir=${exec_prefix}/include

 Name: libpng12
 Description: Loads and saves PNG files
 Version: 1.2.8
 Libs: -L${libdir} -lpng12 -lz
 Cflags: -I${includedir}/libpng12
这个文件告诉我们这些库可以在/usr/local/lib找到,头文件可以在/usr/local/include里找到,库的名字是libpng12并且版本号是1.2.8。它也提供了用于编译依赖于libpng的源代码时需要的链接器参数。
这儿是一个编译时使用pkg-config的样例:
gcc -o test test.c $(pkg-config --libs --cflags libpng)pkg-config 同其他命令一样,有很多选项,不过我们一般只会用到 --libs 和 --cflags 选项,分别用于搜索指定头文件和库文件。
在 Makefile 中则是这样来用:
...
DEPENDENCIES=libcpg libcmap libquorum libqb glib-2.0 fuse sqlite3 librrd

CFLAGS += -I.
CFLAGS += $(shell pkg-config --cflags ${DEPENDENCIES})

LDFLAGS += $(shell pkg-config --libs ${DEPENDENCIES})

.c.o:
        $(CC) $(CFLAGS) -c -o $@ $< -MMD -MT $@ -MF $@.d
...