作者归档:songtianlun

查看文件所属 RPM 包的方法

在 Linux 系统中,有几种方法可以查看文件属于哪个 RPM 包:

  1. 使用 rpm -qf 命令:

    rpm -qf /path/to/file

    例如:

    rpm -qf /bin/ls
  2. 使用 dnf provides 或 yum provides 命令:

    dnf provides /path/to/file
    # 或
    yum provides /path/to/file

    例如:

    dnf provides /bin/ls
  3. 如果是已安装的包,也可以使用 which 和 rpm -qf 组合:

    rpm -qf $(which command_name)

    例如:

    rpm -qf $(which ls)
  4. 对于没有安装的文件,可以搜索包含该文件的包:

    dnf whatprovides /path/to/file
    # 或
    yum whatprovides /path/to/file

这些命令会显示包含指定文件的 RPM 包名称。使用 rpm -qf 最为直接和常用。

补充说明:

  • -q 表示查询(query)
  • -f 表示文件(file)
  • 需要提供文件的完整路径

Git 覆写上次提交

前言

在日常使用 Git 版本控制工具的时候,我们有时会遇到需要修改上次commit提交信息的情况,例如:修改上次提交信息中的错误内容,或者想为上次提交加入些新内容等等。

Git 覆写上次提交(amend)

我们可以使用git commit命令的amend选项来覆写上次提交。

$ git commit --amend

代码清单:使用--amend选项覆写上次提交

执行此命令后,git会自动弹出编辑界面,让你可以修改上次的提交信息。

$ git commit --amend -m "an updated commit message"

代码清单:使用-m选项快速修改

而使用--no-edit选项,表示不更动上次已经提交的信息。适用于添加新内容到上次提交的情况。

$ git commit --amend --no-edit

代码清单:使用--no-edit选项追加内容

而使用--author选项,则可以仅修改提交者信息。

$ git commit --amend --author='someone <someone@example.com>'

代码清单:使用--author选项修改提交者

注意事项

--amend

    Replace the tip of the current branch by creating a new
    commit. The recorded tree is prepared as usual (including
    the effect of the -i and -o options and explicit pathspec),
    and the message from the original commit is used as the
    starting point, instead of an empty message, when no other
    message is specified from the command line via options such
    as -m, -F, -c, etc. The new commit has the same parents and
    author as the current one (the --reset-author option can
    countermand this).

    It is a rough equivalent for:

                $ git reset --soft HEAD^
                $ ... do something else to come up with the right tree ...
                $ git commit -c ORIG_HEAD

    but can be used to amend a merge commit.

    You should understand the implications of rewriting history
    if you amend a commit that has already been published. (See
    the "RECOVERING FROM UPSTREAM REBASE" section in git-
    rebase(1).)

注:关于--amend的说明文档

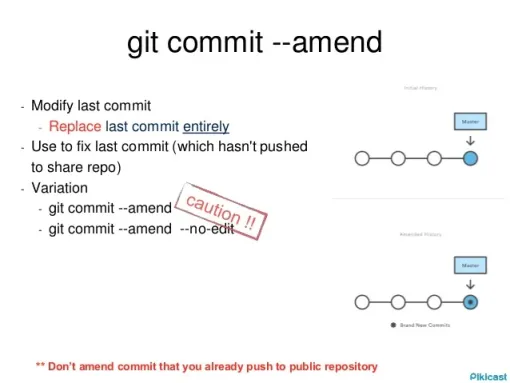
需要注意的是:amend选项不会直接修改上次的提交,而是会新创建出一枚提交,包含了上次提交的全部内容与新添加的内容,原先的提交会被“删除”。可以观察到,修改前后的commit的hash值是不同的。

所以,对于已经推送到远程仓库的提交,需谨慎使用amend。

$ git push 
<remote> <branch> --force

代码清单:git强制覆盖远程分支

对于已经推送到远程仓库的提交,可以使用强制推送来覆盖(谨慎使用)。

注意事项图 By Pikicast

图:git commit --amend 注意事项图「取自Pikicast」

References

#Git

Linux 网卡多队列配置方法

多队列是指网络接口卡具有在多个发送和接收队列上并行处理网络数据包的能力。在使用网卡多队列时,通常需要配置网络中断亲和性(IRQ Affinity),将不同的队列中断分配给特定的CPU处理,而不是由任意的CPU处理,这有助于减少CPU之间的争用并提高网络性能。本文介绍如何配置Linux系统的网卡多队列的网络中断亲和性和修改网卡多队列数。

配置网络中断亲和性

下述操作以Red Hat 9.2镜像系统为例,介绍如何通过ecs_mq脚本自动配置网卡多队列的网络中断亲和性。如果您的系统镜像并非Red Hat Enterprise Linux,已默认开启,则无需再配置。

  1. 远程连接Linux实例。
  2. (可选)关闭irqbalance服务。 由于irqbalance服务会动态调整IRQ Affinity,配置ecs_mq脚本会和irqbalance产生冲突,建议关闭irqbalance服务。
    systemctl stop irqbalance.service
  3. 执行以下命令,下载最新版本的网卡多队列的自动配置脚本ecs_mq。
    wget https://ecs-image-tools.oss-cn-hangzhou.aliyuncs.com/ecs_mq/ecs_mq_2.0.tgz

    最新版ecs_mq修复的问题

  4. 执行以下命令,解压ecs_mq脚本。
    tar -xzf ecs_mq_2.0.tgz
  5. 执行以下命令,更换工作路径。
    cd ecs_mq/
  6. 执行以下命令,运行ecs_mq脚本。
    bash install.sh redhat 9

    说明 请您根据实际环境替换命令中的 redhat 和 9为您自己的<操作系统名称>和<操作系统主版本号>。

  7. 执行以下命令,启动ecs_mq脚本。
    systemctl start ecs_mq

    启动脚本后,系统自动启动网络中断亲和性。

    修改网卡多队列数

  • 执行以下命令,查看主网卡eth0支持多队列的情况。
    ethtool -l eth0

    根据返回结果查看是否支持网卡多队列:

  • 如果 “Pre-set maximums” 下的 “Combined” 值大于1,表示网卡支持多队列。 您可以根据这个最大值来设置当前的队列数: 执行命令sudo ethtool -L eth0 combined N,其中N是您希望设置的队列数,且N应该小于或等于 “Pre-set maximums” 下的 “Combined” 值。
  • Current hardware settings 下的 Combined 值表示当前生效的队列数。 本例中返回表示最多支持2个队列,且当前生效的是1个队列:
    Channel parameters for eth0:
    Pre-set maximums:
    RX: 0
    TX: 0
    Other: 0
    Combined: 2 # 表示最多支持设置2个队列
    Current hardware settings:
    RX: 0
    TX: 0
    Other: 0
    Combined: 1 # 表示当前生效的是1个队列
  • 执行以下命令,设置主网卡使用2个队列功能。
    sudo ethtool -L eth0 combined 2
  • 执行以下命令,查看辅助弹性网卡eth1支持多队列的情况。
    ethtool -l eth1

    通过返回信息可以看到,辅助弹性网卡已开启支持多队列。您可以按需继续执行下述操作自定义配置辅助弹性网卡的多队列数。

    Channel parameters for eth1:
    Pre-set maximums:
    RX: 0
    TX: 0
    Other: 0
    Combined: 4 # 表示网卡硬件最多可以支持4个队列
    Current hardware settings:
    RX: 0
    TX: 0
    Other: 0
    Combined: 1 # 表示当前网卡只使用了1个队列
  • 执行以下命令,设置辅助弹性网卡使用4个队列功能。
    sudo ethtool -L eth1 combined 4

References

使用 GDB 调试 Go 程序

进入调试

使用前,请先确保机器上已经安装 GDB

[root@localhost code]# which gdb /usr/bin/gdb

准备就绪后,以下列测试程序为例

package main

import "fmt"

func main(){
  msg := "hello, world"
  fmt.Println(msg)
}

然后执行 如下命令进行编译,里面有好多个参数,有疑问的可以自行搜索引擎

# 关闭内联优化,方便调试
$ go build -gcflags "-N -l" demo.go

# 发布版本删除调试符号
go build -ldflags “-s -w”

最后使用 GDB 命令进入调试界面

# tui 界面
$ gdb -tui demo 
# 纯终端界面 
$ gdb demo

进入 后就可以打断点调试了

(gdb) b main.main   # 在 main 包里的 main 函数 加断点
Breakpoint 1 at 0x4915c0: file /home/wangbm/code/demo.go, line 5.
(gdb) run  # 执行进程
Starting program: /home/wangbm/code/demo 
Breakpoint 1, main.main () at /home/wangbm/code/demo.go:5
(gdb) 

# 注,如果需要带参数运行,比如正常这样运行:
./app -a 1 --debug
# 在 gdb 中就这样运行
gdb app
(gdb) run -a 1 --debug

调试指令

要熟练使用 GDB ,得熟悉的掌握它的指令,这里列举一下

  • r:run,执行程序
  • n:next,下一步,不进入函数
  • s:step,下一步,会进入函数
  • b:breakponit,设置断点
  • l:list,查看源码
  • c:continue,继续执行到下一断点
  • bt:backtrace,查看当前调用栈
  • p:print,打印查看变量
  • q:quit,退出 GDB
  • whatis:查看对象类型
  • info breakpoints:查看所有的断点
  • info locals:查看局部变量
  • info args:查看函数的参数值及要返回的变量值
  • info frame:堆栈帧信息
  • info goroutines:查看 goroutines 信息。在使用前 ,需要注意先执行 source /usr/local/go/src/runtime/runtime-gdb.py
  • goroutine 1 bt:查看指定序号的 goroutine 调用堆栈
  • 回车:重复执行上一次操作

其中有几个指令的使用比较灵活

# 查看指定行数上下5行
(gdb) l 8

# 查看指定范围的行数
(gdb) l 5:8

# 查看指定文件的行数上下5行
l demo.go:8

# 可以查看函数,记得加包名
l main.main

把上面的 l 换成 b ,大多数也同样适用

# 在指定行打断点 
(gdb) b 8  
# 在指定指定文件的行打断点 
b demo.go:8  
# 在指定函数打断点,记得加包名 
b main.main

还有 p – print,打印变量

# 查看变量
(gdb) p var

# 查看对象长度或容量
(gdb) p $len(var)
(gdb) p $cap(var)

# 查看对象的动态类型
(gdb) p $dtype(var)
(gdb) iface var

# 举例如下
(gdb) p i
$4 = {str = "cbb"}
(gdb) whatis i
type = regexp.input
(gdb) p $dtype(i)
$26 = (struct regexp.inputBytes *) 0xf8400b4930
(gdb) iface i
regexp.input: struct regexp.inputBytes *

以上就是关于 GDB 的使用方法,非常简单,可以自己手动敲下体验一下。

References

Linux overcommit 及 oom-killer 机制

通常是因为某时刻应用程序大量请求内存导致系统内存不足造成的,这通常会触发 Linux 内核里的 Out of Memory (OOM) killer,OOM killer 会杀掉某个进程(用户态进程,不是内核线程)以腾出内存留给系统用,不致于让系统立刻崩溃。

overcommit

Linux 内核根据应用程序的要求分配内存,通常来说应用程序分配了内存但是并没有实际全部使用,为了提高性能,这部分没用的内存可以留作它用,这部分内存是属于每个进程的,内核直接回收利用的话比较麻烦,所以内核采用一种过度分配内存(over-commit memory)的办法来间接利用这部分 “空闲” 的内存,提高整体内存的使用效率。一般来说这样做没有问题,但当大多数应用程序都消耗完自己的内存的时候麻烦就来了,因为这些应用程序的内存需求加起来超出了物理内存(包括 swap)的容量,内核(OOM killer)必须杀掉一些进程才能腾出空间保障系统正常运行。

/proc/sys/vm/overcommit_memory 取值为[0-2],默认值为0:  

0: 启发式过度使用处理,显而易见的过度使用地址空间被拒绝。它在允许的情况下确保 严重分配失败、过度使用以减少交换使用。  
1: 始终过度使用内存,表示kernel永远不会检查是否有足够的内存可用,总是返回true.  
2: 禁止过度使用,表示kernel拒绝 >= 可用的swap+物理内存 * overcommit_ratio(默认为50)的内存分配请求.  
在大多数情况下,这意味着访问页面时不会终止进程,但会在适当时收到内存分配错误。

#16 GB Swap, 16 GB RAM, overcommit_memory=2 内存请求上限及计算方法
# free
              total        used        free      shared  buff/cache   available
Mem:       16311328     6048244      573316       42992     9689768     8963032
Swap:      16601084     3580760    13020324

# 计算方法
cat /proc/sys/vm/overcommit_ratio #默认50
Mem * overcommit_ratio (50%) + swap= 8155664 + 16601084 = 24756748 kB

16G+16G*50%/100=24G (overcommit_memory = 2)
若修改vm.overcommit_raito为100,则请求内存16G+16G*100%/100=32G

# grep -i commit /proc/meminfo
CommitLimit:    24756748 kB
Committed_AS:   14178044 kB

cat << EOF >> /etc/sysctl.conf
vm.overcommit_memory=1 #redis
vm.overcommit_ratio=50 # 默认
EOF
sysctl -p

oom killer

查看oom killer 日志,最常见的就是MySQL 无缘无故挂掉,Out of memory: Kill process信息:

grep -i "kill" /var/log/messages #CentOS
#grep -i "kill" /var/log/kern.log #Ubuntu
...
Out of memory: Kill process 9682 (mysqld) score 9 or sacrifice child
Killed process 9682, UID 27, (mysqld) total-vm:47388kB, anon-rss:3744kB, file-rss:80kB
httpd invoked oom-killer: gfp_mask=0x201da, order=0, oom_adj=0, oom_score_adj=0
httpd cpuset=/ mems_allowed=0
Pid: 8911, comm: httpd Not tainted 2.6.32-279.1.1.el6.i686 #1
...

内核检测到系统内存不足、挑选并杀掉某个进程的过程可以参考内核源代码 linux/mm/oom_kill.c,该函数会计算每个进程的点数(0~1000)。点数越高,这个进程越有可能被杀死。每个进程的点数跟oom_score_adj有关,而且oom_score_adj可以被设置(-1000最低,1000最高)。

out_of_memory() 被触发,然后调用 select_bad_process() 选择一个 “bad” 进程杀掉,挑选的过程由 oom_badness() 决定,挑选的算法和想法都很简单很朴实:最 bad 的那个进程就是那个最占用内存的进程。

/**
 * oom_badness - heuristic function to determine which candidate task to kill
 * @p: task struct of which task we should calculate
 * @totalpages: total present RAM allowed for page allocation
 *
 * The heuristic for determining which task to kill is made to be as simple and
 * predictable as possible.  The goal is to return the highest value for the
 * task consuming the most memory to avoid subsequent oom failures.
 */
unsigned long oom_badness(struct task_struct *p, struct mem_cgroup *memcg,
              const nodemask_t *nodemask, unsigned long totalpages)
{
    long points;
    long adj;

    if (oom_unkillable_task(p, memcg, nodemask))
        return 0;

    p = find_lock_task_mm(p);
    if (!p)
        return 0;

    adj = (long)p->signal->oom_score_adj;
    if (adj == OOM_SCORE_ADJ_MIN) {
        task_unlock(p);
        return 0;
    }

    /*
     * The baseline for the badness score is the proportion of RAM that each
     * task's rss, pagetable and swap space use.
     */
    points = get_mm_rss(p->mm) + p->mm->nr_ptes +
         get_mm_counter(p->mm, MM_SWAPENTS);
    task_unlock(p);

    /*
     * Root processes get 3% bonus, just like the __vm_enough_memory()
     * implementation used by LSMs.
     */
    if (has_capability_noaudit(p, CAP_SYS_ADMIN))
        adj -= 30;

    /* Normalize to oom_score_adj units */
    adj *= totalpages / 1000;
    points += adj;

    /*
     * Never return 0 for an eligible task regardless of the root bonus and
     * oom_score_adj (oom_score_adj can't be OOM_SCORE_ADJ_MIN here).
     */
    return points > 0 ? points : 1;
}

上面代码里的注释写的很明白,理解了这个算法我们就理解了为啥 MySQL 躺着也能中枪了,因为它的体积总是最大(一般来说它在系统上占用内存最多),所以如果 Out of Memeory (OOM) 的话总是不幸第一个被 kill 掉。解决这个问题最简单的办法就是增加内存,或者想办法优化 MySQL 使其占用更少的内存,除了优化 MySQL 外还可以优化系统,让系统尽可能使用少的内存以便应用程序(如 MySQL) 能使用更多的内存,还有一个临时的办法就是调整内核参数,让 MySQL 进程不容易被 OOM killer 发现。

找出最有可能被 OOM Killer 杀掉的进程

# cat /data/shell/oomscore.sh 
#!/bin/bash
for proc in $(find /proc -maxdepth 1 -regex '/proc/[0-9]+'); do
    printf "%2d %5d %s\n" \
        "$(cat $proc/oom_score)" \
        "$(basename $proc)" \
        "$(cat $proc/cmdline | tr '\0' ' ' | head -c 50)"
done 2>/dev/null | sort -nr | head -n 10

调整oom_adj

`/proc/

/oom_adj` ​值范围是[-17, 15],oom_score 值越高越容易被oom kill掉。设为 `-17`则该进程禁用 oom_killer。 比如查看进程号为187418的 omm_score,这个分数被上面提到的 omm_score_adj 参数调整后(-15),就变成了3: “`bash pidof mysqld 187418 # cat /proc/187418/oom_score 18 # echo -15 > /proc/187418/oom_score_adj # cat /proc/981/oom_score 3 “` # 配置oom killer 我们可以通过一些内核参数来调整 OOM killer 的行为,避免系统在那里不停的杀进程。比如我们可以在触发 OOM 后立刻触发 kernel panic,kernel panic 10秒后自动重启系统。 > 修改panic_on_oom值为1,表示请求内存不足时10秒后重启系统 “`bash cat <> /etc/sysctl.conf vm.panic_on_oom=1 kernel.panic=10 # 表示10s后重启 EOF sysctl -p “` # 内核参数 “`bash /proc/sys/vm/panic_on_oom 取值为[0-2],默认值为0: 0: OOM时系统执行OOM Killer 1: OOM时系统会panic(恐慌) 2: OOM时系统一定会触发panic(恐慌) /proc/sys/vm/oom_kill_allocating_task 取值为[0-1],默认值为0: 0: 内核将检查每个进程的分数,分数最高的进程将被kill掉 1: 那么内核将kill掉当前申请内存的进程 “` # References – [Linux overcommit 及 oom-killer 机制](https://sundayle.sundayhk.com/linux-overcommit-oom-killer/) – [理解和配置 Linux 下的 OOM Killer](https://www.vpsee.com/2013/10/how-to-configure-the-linux-oom-killer/) – [kernel overcommit accounting](https://www.kernel.org/doc/Documentation/vm/overcommit-accounting) – [Virtual memory settings in Linux – The Problem with Overcommit](http://engineering.pivotal.io/post/virtual_memory_settings_in_linux_-_the_problem_with_overcommit/)
基于 listmonk 实现 rss to mail

listmonk 部署

安装 官方教程 进行即可,大致如下:

# Download the compose file to the current directory.
curl -LO https://github.com/knadh/listmonk/raw/master/docker-compose.yml

# Run the services in the background.
docker compose up -d

rss to mail 脚本

主程序 main.py

    import feedparser
    import requests
    import json
    import os
    import logging
    from time import sleep
    from dateutil import parser
    from typing import List, Dict
    import re

    # 配置日志
    logging.basicConfig(
        level=logging.DEBUG,
        format='%(asctime)s - %(levelname)s - %(message)s',
        handlers=[
            logging.FileHandler('rss_checker.log'),
            logging.StreamHandler()
        ]
    )
    logger = logging.getLogger(__name__)

    RSS_URL = os.getenv('RSS_URL', "https://xxx.com/feed/")
    LISTMONK_API_URL = os.getenv('LISTMONK_API_URL', "https://listmonk.xxx.com/api/campaigns")
    LISTMONK_TOKEN = os.getenv('LISTMONK_TOKEN', "bot:xxx")
    LISTMONK_SEND_LIST_ID = int(os.getenv('LISTMONK_SEND_LIST_ID', 4))
    LISTMONK_SEND_LIST_IDS = [LISTMONK_SEND_LIST_ID]

    class RSSChecker:
        def __init__(self):
            self.rss_url = RSS_URL
            self.listmonk_url = LISTMONK_API_URL
            self.headers = {
                "Content-Type": "application/json",
                "Authorization": "token" + LISTMONK_TOKEN
            }
            self.max_retries = 3
            self.retry_delay = 5  # seconds

        def clean_html_content(self, html_content: str) -> str:
            """清理HTML内容,移除以http://或https://开头的内容"""
            try:
                if not html_content:
                    return ""

                # 移除以http://或https://开头的内容
                cleaned_content = re.sub(r'https?://\S+', '', html_content)

                # 清理多余的空白字符
                cleaned_content = re.sub(r'\s+', ' ', cleaned_content).strip()

                return cleaned_content

            except Exception as e:
                logger.error(f"清理HTML内容时出错: {str(e)}")
                return html_content  # 如果处理失败,返回原始内容

        def get_last_check_time(self) -> str:
            try:
                with open('last_check.txt', 'r') as f:
                    last_time = f.read().strip()
                    logger.debug(f"读取到上次检查时间: {last_time}")
                    return last_time
            except:
                logger.warning("未找到上次检查时间文件")
                return ''

        def save_check_time(self, time: str) -> None:
            try:
                with open('last_check.txt', 'w') as f:
                    f.write(time)
                logger.debug(f"保存本次检查时间: {time}")
            except Exception as e:
                logger.error(f"保存检查时间时出错: {str(e)}")

        def create_email_content(self, entries: List[Dict]) -> str:
            """创建美化的HTML邮件内容"""
            html_content = """

<style>
                .header {
                    text-align: center;
                    margin-bottom: 40px;
                    padding: 20px;
                    background-color: #f8f9fa;
                    border-radius: 8px;
                }
                .main-title {
                    font-size: 28px;
                    color: #2c3e50;
                    margin-bottom: 10px;
                }
                .subtitle {
                    font-size: 20px;
                    color: #34495e;
                    margin-bottom: 15px;
                }
                .blog-name {
                    font-size: 24px;
                    color: #16a085;
                    margin-bottom: 10px;
                }
                .blog-description {
                    font-size: 16px;
                    color: #7f8c8d;
                    margin-bottom: 20px;
                }
                .article-container {
                    font-family: Arial, sans-serif;
                    max-width: 800px;
                    margin: 0 auto;
                    padding: 20px;
                }
                .article {
                    margin-bottom: 30px;
                    border-bottom: 1px solid #eee;
                    padding-bottom: 20px;
                }
                .article-title {
                    color: #333;
                    font-size: 24px;
                    margin-bottom: 10px;
                }
                .article-summary {
                    color: #666;
                    line-height: 1.6;
                    margin-bottom: 15px;
                }
                .read-more {
                    display: inline-block;
                    padding: 8px 15px;
                    background-color: #4CAF50;
                    color: white;
                    text-decoration: none;
                    border-radius: 4px;
                }
                .read-more:hover {
                    background-color: #45a049;
                }
            </style>
            <div class="article-container">
                <div class="header">
                <h1 class="main-title">烹茶室(Oskyla 晴空阁) 更新了!</h1>
                    <h2 class="subtitle">欢迎访问 Frytea's Blog</h2>
                    <h3 class="blog-name">Oskyla 烹茶室</h3>
                    <p class="blog-description">价值信息藏书阁,统一门户入口。</p>
                </div>
            """

            for entry in entries:
                # 清理文章标题和摘要中的HTML内容
                clean_title = self.clean_html_content(entry.title)
                clean_summary = self.clean_html_content(entry.summary)

                html_content += f"""
                <div class="article">
                    <h2 class="article-title">{clean_title}</h2>
                    <div class="article-summary">{clean_summary}</div>
                    <a href="{entry.link}" class="read-more">阅读全文</a>
                </div>
                """

            html_content += "</div>"
            return html_content

        def publish_campaign(self, campaign_id: int) -> bool:
            for attempt in range(self.max_retries):
                try:
                    publish_url = f"{self.listmonk_url}/{campaign_id}/status"
                    response = requests.put(
                        publish_url,
                        headers=self.headers,
                        json={"status": "running"}
                    )

                    if response.status_code == 200:
                        logger.info(f"活动 {campaign_id} 发布成功")
                        return True

                    logger.warning(f"发布尝试 {attempt + 1} 失败: HTTP {response.status_code}")
                    if attempt < self.max_retries - 1:
                        sleep(self.retry_delay)

                except requests.exceptions.RequestException as e:
                    logger.error(f"发布API请求异常: {str(e)}")
                    if attempt < self.max_retries - 1:
                        sleep(self.retry_delay)

            return False

        def send_newsletter(self, new_entries: List[Dict]) -> bool:
            try:
                content = self.create_email_content(new_entries)
                # 获取文章数量
                article_count = len(new_entries)
                # 清理标题中的HTML内容
                #titles = ", ".join(self.clean_html_content(entry.title) for entry in new_entries)

                data = {
                    "name": "Frytea's Blog 更新通知",
                    "subject": f"Frytea's Blog 更新了 {article_count} 篇新文章",
                    "lists": LISTMONK_SEND_LIST_IDS,
                    "content_type": "html",
                    "body": content,
                    "type": "regular"
                }

                logger.debug("准备发送的数据: %s", json.dumps(data, indent=2))

                response = requests.post(self.listmonk_url, headers=self.headers, json=data)
                if response.status_code == 200:
                    campaign_id = response.json().get('data', {}).get('id')
                    if campaign_id:
                        return self.publish_campaign(campaign_id)

                logger.error(f"创建活动失败: HTTP {response.status_code}")
                return False

            except Exception as e:
                logger.error(f"发送邮件时出错: {str(e)}")
                return False

        def check_and_send(self) -> None:
            try:
                logger.info(f"开始解析RSS源: {self.rss_url}")
                feed = feedparser.parse(self.rss_url)

                if feed.bozo:
                    logger.error(f"RSS解析错误: {feed.bozo_exception}")
                    return

                if not feed.entries:
                    logger.warning("RSS源没有任何条目")
                    return

                last_check = self.get_last_check_time()
                new_entries = []

                #for entry in feed.entries:
                #    if not last_check or entry.published > last_check:
                #        new_entries.append(entry)

                for entry in feed.entries:
                    # 将字符串解析为 datetime 对象
                    entry_time = parser.parse(entry.published)
                    last_check_time = parser.parse(last_check) if last_check else None

                    if not last_check_time or entry_time > last_check_time:
                        new_entries.append(entry)

                if new_entries:
                    logger.info(f"检测到 {len(new_entries)} 篇新文章")
                    if self.send_newsletter(new_entries):
                        self.save_check_time(max(entry.published for entry in new_entries))
                else:
                    logger.info("没有新文章")

            except Exception as e:
                logger.error(f"执行过程中出现未预期的错误: {str(e)}", exc_info=True)

    if __name__ == "__main__":
        checker = RSSChecker()
        checker.check_and_send()

依赖 requirements.txt

beautifulsoup4==4.12.3
feedparser==6.0.11
Requests==2.32.3

为方便使用的 Makefile

all: broadcast  

broadcast: venv  
    venv/bin/python3 main.py  

venv:  
    python3 -m venv venv  
    venv/bin/pip3 install -r requirements.txt -i https://mirrors.tuna.tsinghua.edu.cn/pypi/web/simple

定时触发脚本,定时运行即可,修改为自己的内容。

export RSS_URL=https://xxx.com/feed/
export LISTMONK_API_URL=https://listmonk.xxx.com/api/campaigns
export LISTMONK_TOKEN=apiusername:api-token
export LISTMONK_SEND_LIST_ID=3

cd /mnt/data/script/listmonk_RSS_to_mail &&  make 

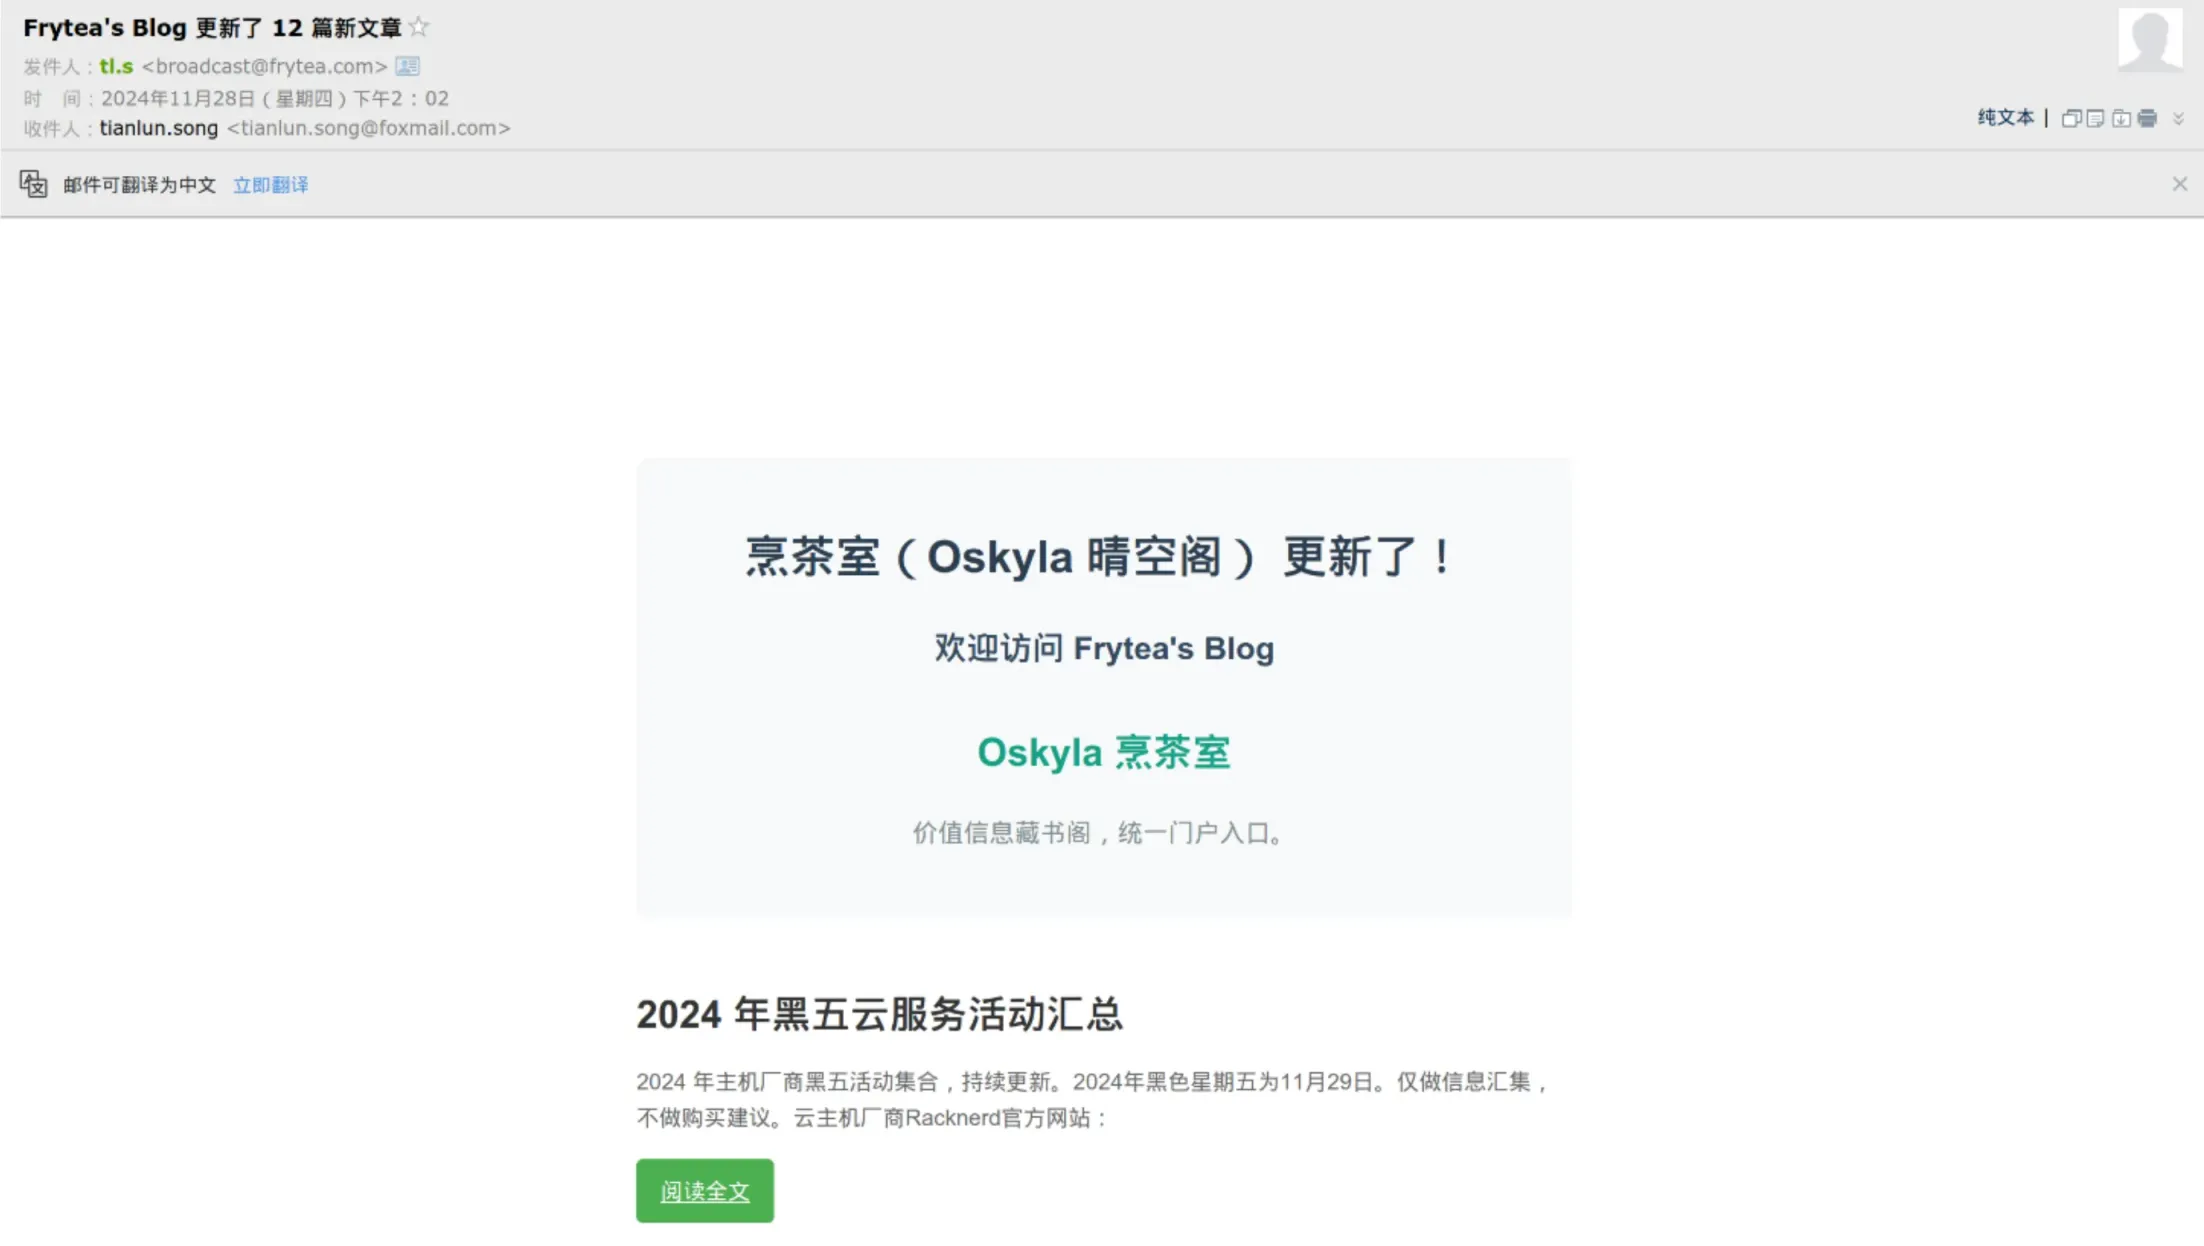
效果展示

邮件效果展示

欢迎订阅:https://frytea.com/subscribe.html

References

listmonk 导入 Mailchimp 邮件清单

使用单行 perl 脚本将 Mailchimp 导出的数据转换为 listmonk 可用的清单。

perl -e 'print qq{email,name,attributes\n};while(<>){ my @r = split /,/; next unless $r[0] =~ /@/; map { s/"//g } @r; my $name = $r[1]; $name .= " $r[2]" if $r[2]; $name ||= "Unknown Name"; print qq{$r[0],"$name","{""mailchimp"": true}"\n}}' subscribed_segment_export_xxxxx.csv 

References

Docker 部署 mautic 并增加插件和翻译包等

Docker 部署方法

参考:https://github.com/mautic/docker-mautic/tree/mautic5/examples

增加插件

使用如下 Dockerfile

FROM mautic/mautic:5-apache

COPY ./plugins/ /var/www/html/docroot/plugins/

结合以下 Makefile

all:
        docker build -t mautic/mautic:5-apache-my .

整个目录架构是这样:

root@tencent-gz1:/data/docker/mautic/add-something# tree -L 2 .
.
├── Dockerfile
├── Makefile
├── plugins
│   └── MauticRssToEmailBundle
└── translations
    └── zh_CN.zip

执行

增加语言包

在 Dockerfile 增加一个目录:

FROM mautic/mautic:5-apache

COPY ./plugins/ /var/www/html/docroot/plugins/
COPY ./translations/ /var/www/html/docroot/translations/

之后将语言包放入 translations 再构建新镜像即可。

比如下载简体中文类似这样做 :

wget https://language-packs.mautic.com/zh_CN.zip
unzip zh_CN.zip
mv zh_CN ./translations/

常见问题

500

root@tencent-gz1:/data/docker/mautic# docker exec -it basic-mautic_web-1 bash
root@f1088e8096c1:/var/www/html/docroot# cd ..
root@f1088e8096c1:/var/www/html# php bin/console cache:clear
root@7756b780cd1c:/var/www/html# php bin/console cache:clear
// Clearing the cache for the prod environment with debug false
[OK] Cache for the "prod" environment (debug=false) was successfully cleared. 

References

Ceph RBD 查看实际占用top

rbd du -p ssd | awk '  
NR>1 {  
   size=$4  
   unit=$5  
   if (unit=="MiB") size=size  
   else if (unit=="GiB") size=size*1024  
   else if (unit=="TiB") size=size*1024*1024  
   print size " " unit " " $0  
}' | sort -nr | head -n 50 | cut -d" " -f3-

by claude 3.5

效果:

root@pve1:~# rbd du -p ssd | awk '  
NR>1 {  
   size=$4  
   unit=$5  
   if (unit=="MiB") size=size  
   else if (unit=="GiB") size=size*1024  
   else if (unit=="TiB") size=size*1024*1024  
   print size " " unit " " $0  
}' | sort -nr | head -n 50 | cut -d" " -f3-  

<TOTAL>                                              111 TiB    47 TiB  
vm-1033-disk-0                                        20 TiB    20 TiB  
vm-1054-disk-1@bak20240731                          1000 GiB   677 GiB  
vm-503-disk-3                                        500 GiB   500 GiB  
vm-502-disk-3                                        500 GiB   500 GiB  
vm-501-disk-3                                        500 GiB   500 GiB  
vm-1054-disk-1@bak20231106                          1000 GiB   475 GiB  
vm-497-disk-0@backup0530                             500 GiB   340 GiB  
vm-1279-disk-1                                       320 GiB   320 GiB  
vm-1090-disk-0                                       300 GiB   300 GiB